https://linode.com/docs/networking/vpn/configure-openvpn-access-server-to-tunnel-traffic/
How to Configure OpenVPN Access Server to Tunnel Traffic
Reply

https://linode.com/docs/networking/vpn/configure-openvpn-access-server-to-tunnel-traffic/
https://linode.com/docs/networking/vpn/install-openvpn-access-server-on-linux/
For excessively paranoid client authentication.
Organization & Common Name: Some human identifier for this server CA.
openssl genrsa -des3 -out ca.key 4096
openssl req -new -x509 -days 365 -key ca.key -out ca.crt
Organization & Common Name = Person name
openssl genrsa -des3 -out client.key 4096
openssl req -new -key client.key -out client.csr
# self-signed
openssl x509 -req -days 365 -in client.csr -CA ca.crt -CAkey ca.key -set_serial 01 -out client.crt
So that it may be installed in most browsers.
openssl pkcs12 -export -clcerts -in client.crt -inkey client.key -out client.p12
Combines client.crt and client.key into a single PEM file for programs using openssl.
openssl pkcs12 -in client.p12 -out client.pem -clcerts
Use client.p12. Actual instructions vary.
So that the Web server knows to ask for (and validate) a user’s Client Key against the internal CA certificate.
ssl_client_certificate /path/to/ca.crt;
ssl_verify_client optional; # or `on` if you require client key
Configure nginx to pass the authentication data to the backend application:
Original posting: https://gist.github.com/mtigas/952344#client-side-ssl
This wireless security system is widely used by ADT and companies providing security.
IMPASSA Self-Contained 2-Way Wireless Security System
DSC – IMPASSA Self-Contained 2-Way Wireless Security System – User Video English
DSC IMPASSA 2 Way Wireless Security System
How to Change Master and User Code on DSC Powerseries
How to Program DSC Neo Proxy and PG9939 Keyfob
The default code is 1234 or 5555.
It might be changed on your system and if you make few wrong attempts the keyboard will be locked temporarily.
How to reset to factory settings
If you do not have the master code or installer code you are limited in what you can do with the system.
You can do a factory reset and will be able to set your own master code.
NOTE: If you do a factory reset all settings will be lost including any zones, sensor information, etc.
To do a factory reset do the following:
Now you device is factory reset. You need to configure everything including set the date and time.
The default master/installer code is 1234
If you have the master/installer code you can do things like
[*][5] [1][2][3][4]  [<][>]     [*]               [9][7][1][3]     [#]
       master code   select user      to access code    new user code    exit
[*][5] [1][2][3][4]  [<][>]     [*]               [*]      [#]
       master code   select user      to access code    delete   exit
Letsencrypt provides free SSL certificates
Certbot automates re-newal and installation of the certificates
$ sudo add-apt-repository ppa:certbot/certbot
$ sudo apt-get update
$ sudo apt-get install python-certbot-apache
$ certbot --apache
$ certbot --apache certonly
$ sudo certbot certonly --manual --preferred-challenges=dns --email yourname@yourdomain.com --server https://acme-v02.api.letsencrypt.org/directory --agree-tos -d *.yourdomain.com
The Certbot packages on your system come with a cron job that will renew your certificates automatically before they expire. Since Let’s Encrypt certificates last for 90 days, it’s highly advisable to take advantage of this feature.
$ sudo certbot renew --apache
I bought a Dell XPS 15 9560 recently and after setting it up and updating all drivers, etc. I noticed there was a lag/stuttering when using Google Chrome browser.
It turns out I was not alone – apparently many people noticed the same problem. I came across this reddit thread which helped me to fix the issue: [XPS 15 9560/Precision 55520] FIX for Lag/Stuttering on Kaby Lake
The problem seems to be a buggy driver for the Intel HD Graphics 630 display adapter.
The most current version (as of the time of writing) on the Dell web site is version 21.20.16.4574
In order to fix the problem you need to download version 21.20.16.4590 from the Intel’s web site: Intel® Graphics Driver for Windows [15.45.14.4590]
EDIT (17 April 2017): You should see a yellow banner on Intel’s site saying there is a newer version of the driver:

It is version 15.45.16.4627 and it is working fine on the same computer I installed 4590 before. You may wanna use the newer one. The steps below are the same regardless if you use 4627 or 4590.
There is .exe and .zip file. Download the .zip file and save it on your disk. Extract the files.
Right-click the start button and run Device Manager:
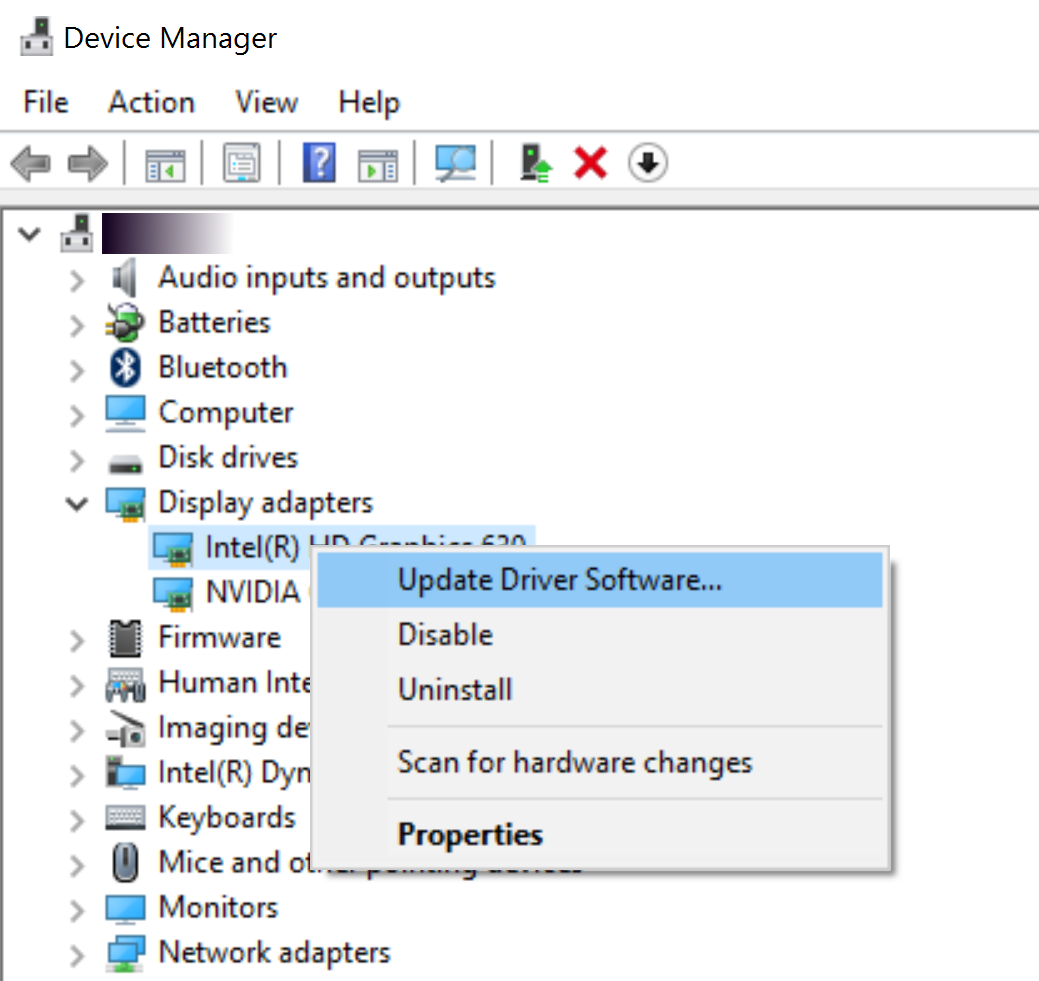
Expand the Display Adapters, right-click Intel(R) HD Graphics 630 and select Update Driver Software…
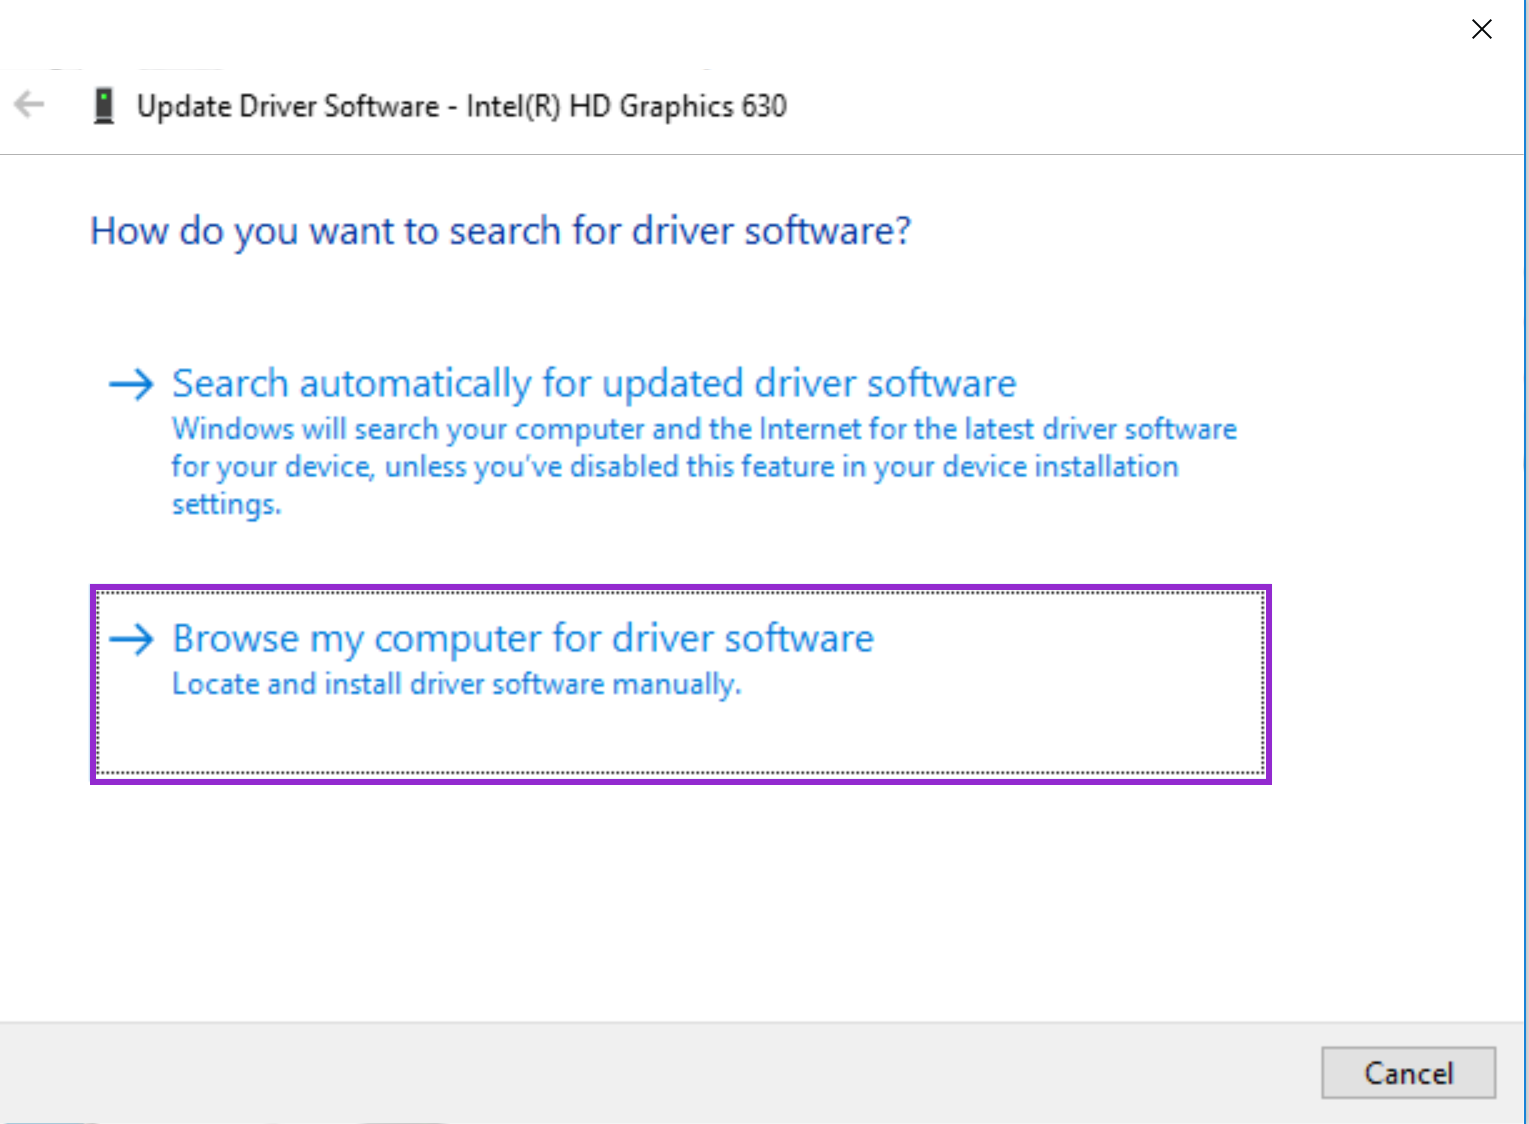
Important: In the dialog below do not click Next or Browse. Instead click on Let me pick from a list of devices on my computer.
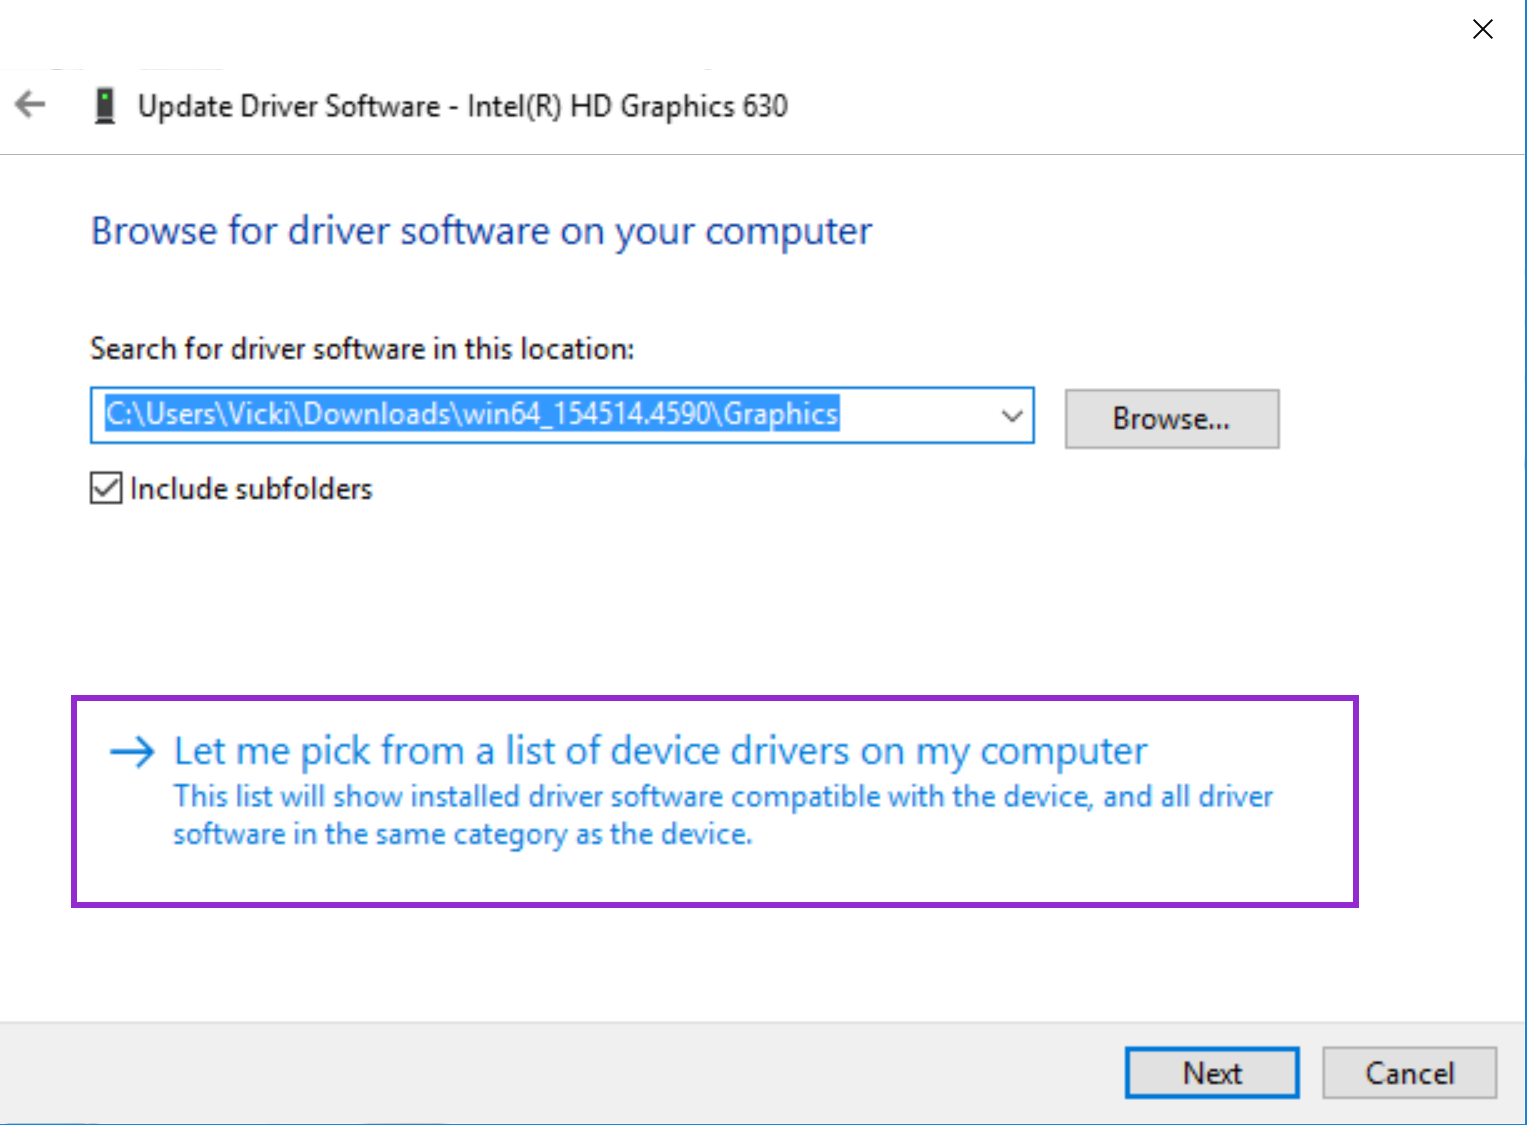
You will see a list of devices. This just shows the graphic card and what drivers are installed. You may have more than one driver installed for the same graphic card. This is normal – when a newer version is installed the old one is kept so you can revert back to an older driver if you want.
Important: The picture below shows one of the items selected – this was my mistake. You do not have to select one. Just click Have Disk… to continue.
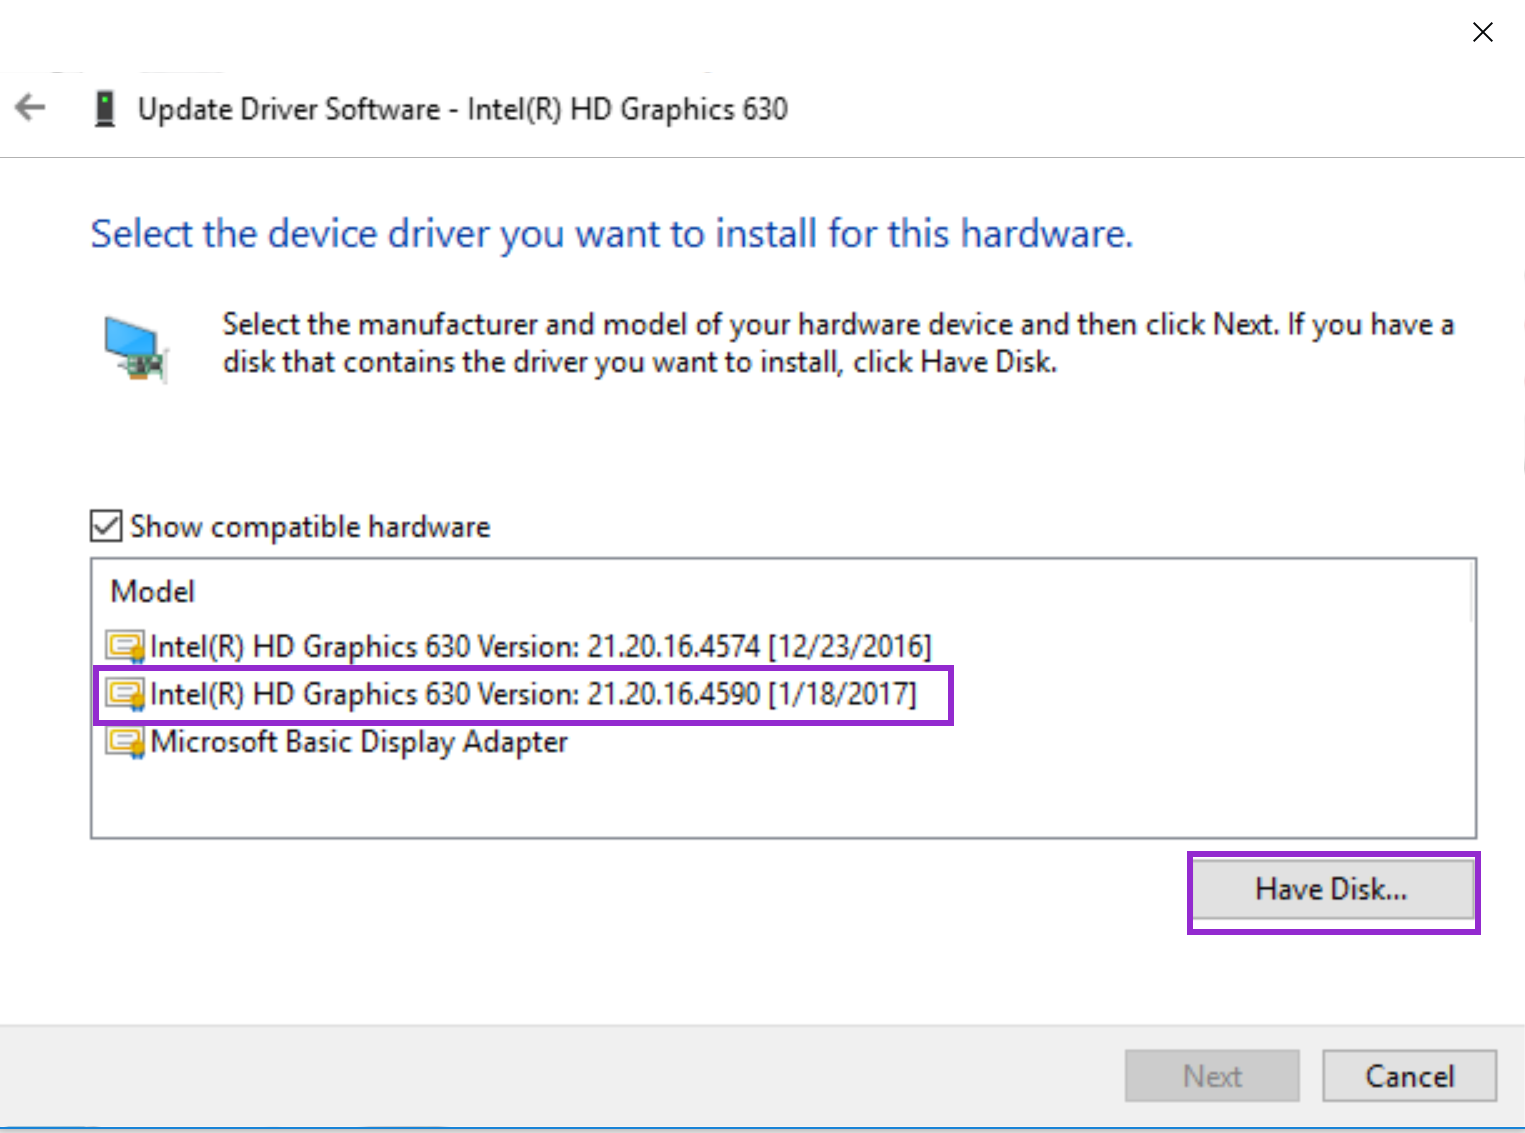
Navigate to the folder where the drivers were unzipped. Open the Graphics folder. In my case the full path is C:\Users\Vicki\Downloads\win64_154514.4590\Graphics
There should be an .inf file. Select it and click Open.

This should start the installation. After it is complete verify the driver has version 21.20.16.4590.
Note: The steps might be different for you since I took the screen-shots after I had the new driver installed.
The important part is to not click Next but to choose Let me pick from a list of devices on my computer as mentioned earlier.
This seems to fix the lag/stuttering I was experiencing. I hope this works for you too.
Update:
sudo apt-get update        # Fetches the list of available updates
sudo apt-get upgrade       # Strictly upgrades the current packages
sudo apt-get dist-upgrade  # Installs updates (new ones)
Clean up the system from old packages:
sudo apt-get update && sudo apt-get autoclean && sudo apt-get clean && sudo apt-get autoremoveCheck the Ubuntu version:
lsb_release -a
You can force IPv4 with:
apt-get -o Acquire::ForceIPv4=true update
or IPv6:
apt-get -o Acquire::ForceIPv6=true update
To make this persistent,check this post out:
https://www.vultr.com/docs/force-apt-get-to-ipv4-or-ipv6-on-ubuntu-or-debian