rundll32 sysdm.cpl,EditEnvironmentVariablesOpen Environment Variables panel from command line
Reply

rundll32 sysdm.cpl,EditEnvironmentVariablesCredits go to:
https://www.webiboo.com/how-to-uninstall-programs-using-command-prompt
The traditional way of uninstalling a program on windows is by opening the system’s Control Panel and head on to the Programs and Features section. That is the usual procedure on early versions of Windows (XP, Vista & 7), while the versions (8 & 10) gives an easy way on navigating the Control Panel by right clicking the program on startup and click “Uninstall” option on the context menu.

Image by rawpixel.com – www.freepik.comHowever, there are some other ways on getting rid of a program on windows, one of which is by using the Windows Management Instrumentation Command line (WMIC) tool through system’s command prompt. With simple command lines, you can remove some programs easily without accessing the Control Panel.
Note that this procedure only works on programs that recognized as MSI-Based Applications (programs that was installed using Windows Installer). Some applications does not register on WMI default registry location upon installing, hence, wmic won’t be able to pull off all programs installed in your system when running the query.
Moving on, here’s how to uninstall programs using command prompt in windows.
1. Open command prompt as administrator
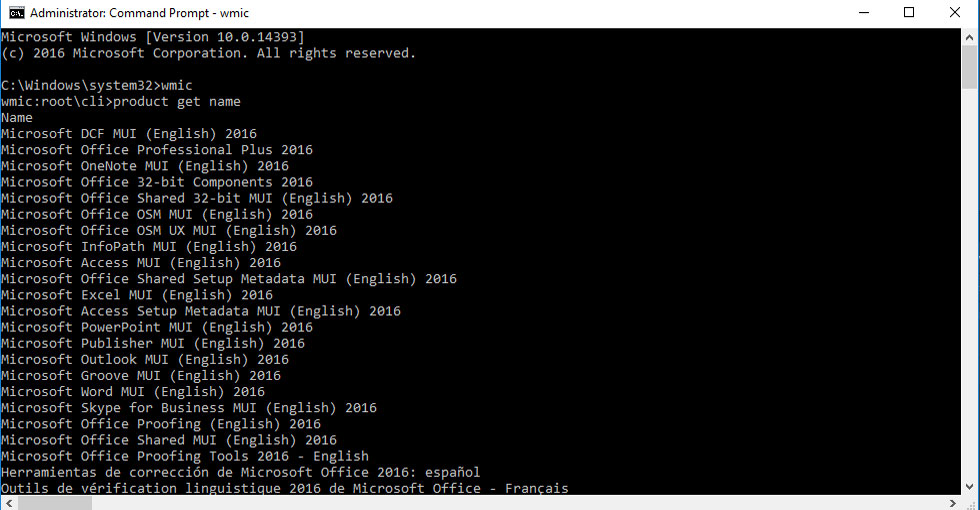
2. Type wmic and press Enter, you will see a prompt wmic:root\cli>
3. Type product get name and press Enter. You will be prompted a list of MSI-Based programs installed on your computer.
4. Type in product where name=”name of program” call uninstall and press Enter.
5. Type Y to confirm uninstalling the program, and then hit Enter.
Once the uninstalling is successful, you will be prompted a return value of 0. However, if you get the error No Instance(s) Available, it means that the program you are trying to uninstall is not recognized as MSI-based application or there’s no such product installed on your system. Be sure to double check your inputs if you have typed the program/product name accurately.
Yield: 24 oysters
Use the attached PowershellScript. Make modifications as needed before running it.
To Export the Application Pools on IIS 7 :
%windir%\system32\inetsrv\appcmd list apppool /config /xml > c:\apppools.xml
To import the Application Pools:
%windir%\system32\inetsrv\appcmd add apppool /in < c:\apppools.xml
To Export all you’re website:
%windir%\system32\inetsrv\appcmd list site /config /xml > c:\sites.xml
To Import the website:
%windir%\system32\inetsrv\appcmd add site /in < c:\sites.xml
To export/import a single application pool:
%windir%\system32\inetsrv\appcmd list apppool “MyAppPool” /config /xml > c:\myapppool.xml
For further information: Exporting and Importing Sites and App Pools from IIS
Rsync, which stands for “remote sync”, is a remote and local file synchronization tool. It uses an algorithm that minimizes the amount of data copied by only moving the portions of files that have changed.
In this guide, we will cover the basic usage of this powerful utility.
Rsync is a very flexible network-enabled syncing tool. Due to its ubiquity on Linux and Unix-like systems and its popularity as a tool for system scripts, it is included on most Linux distributions by default.
The basic syntax of rsync is very straightforward, and operates in a way that is similar to ssh, scp, and cp.
We will create two test directories and some test files with the following commands:
cd ~
mkdir dir1
mkdir dir2
touch dir1/file{1..100}
Copy
We now have a directory called dir1 with 100 empty files in it.
ls dir1
Copy
Outputfile1    file18  file27  file36  file45  file54  file63  file72  file81  file90
file10   file19  file28  file37  file46  file55  file64  file73  file82  file91
file100  file2   file29  file38  file47  file56  file65  file74  file83  file92
file11   file20  file3   file39  file48  file57  file66  file75  file84  file93
file12   file21  file30  file4   file49  file58  file67  file76  file85  file94
file13   file22  file31  file40  file5   file59  file68  file77  file86  file95
file14   file23  file32  file41  file50  file6   file69  file78  file87  file96
file15   file24  file33  file42  file51  file60  file7   file79  file88  file97
file16   file25  file34  file43  file52  file61  file70  file8   file89  file98
file17   file26  file35  file44  file53  file62  file71  file80  file9   file99
We also have an empty directory called dir2.
To sync the contents of dir1 to dir2 on the same system, type:
rsync -r dir1/ dir2
Copy
The -r option means recursive, which is necessary for directory syncing.
We could also use the -a flag instead:
rsync -a dir1/ dir2
Copy
The -a option is a combination flag. It stands for “archive” and syncs recursively and preserves symbolic links, special and device files, modification times, group, owner, and permissions. It is more commonly used than -r and is usually what you want to use.
You may have noticed that there is a trailing slash (/) at the end of the first argument in the above commands:
rsync -a dir1/ dir2
Copy
This is necessary to mean “the contents of dir1”. The alternative, without the trailing slash, would place dir1, including the directory, within dir2. This would create a hierarchy that looks like:
~/dir2/dir1/[files]
Copy
Always double-check your arguments before executing an rsync command. Rsync provides a method for doing this by passing the -n or --dry-run options. The -v flag (for verbose) is also necessary to get the appropriate output:
rsync -anv dir1/ dir2
Copy
Outputsending incremental file list
./
file1
file10
file100
file11
file12
file13
file14
file15
file16
file17
file18
. . .
Compare this output to the output we get when we remove the trailing slash:
rsync -anv dir1 dir2
Copy
Outputsending incremental file list
dir1/
dir1/file1
dir1/file10
dir1/file100
dir1/file11
dir1/file12
dir1/file13
dir1/file14
dir1/file15
dir1/file16
dir1/file17
dir1/file18
. . .
You can see here that the directory itself is transferred.
Syncing to a remote system is trivial if you have SSH access to the remote machine and rsync installed on both sides. Once you have SSH access verified between the two machines, you can sync the dir1 folder from earlier to a remote computer by using this syntax (note that we want to transfer the actual directory in this case, so we omit the trailing slash):
rsync -a ~/dir1 username@remote_host:destination_directory
Copy
This is called a “push” operation because it pushes a directory from the local system to a remote system. The opposite operation is “pull”. It is used to sync a remote directory to the local system. If the dir1 were on the remote system instead of our local system, the syntax would be:
rsync -a username@remote_host:/home/username/dir1 place_to_sync_on_local_machine
Copy
Like cp and similar tools, the source is always the first argument, and the destination is always the second.
Rsync provides many options for altering the default behavior of the utility. We have already discussed some of the more necessary flags.
If you are transferring files that have not already been compressed, like text files, you can reduce the network transfer by adding compression with the -z option:
rsync -az source destination
Copy
The -P flag is very helpful. It combines the flags --progress and --partial. The first of these gives you a progress bar for the transfers and the second allows you to resume interrupted transfers:
rsync -azP source destination
Copy
Outputsending incremental file list
./
file1
           0 100%    0.00kB/s    0:00:00 (xfer#1, to-check=99/101)
file10
           0 100%    0.00kB/s    0:00:00 (xfer#2, to-check=98/101)
file100
           0 100%    0.00kB/s    0:00:00 (xfer#3, to-check=97/101)
file11
           0 100%    0.00kB/s    0:00:00 (xfer#4, to-check=96/101)
. . .
If we run the command again, we will get a shorter output, because no changes have been made. This illustrates rsync’s ability to use modification times to determine if changes have been made.
rsync -azP source destination
Copy
Outputsending incremental file list
sent 818 bytes received 12 bytes 1660.00 bytes/sec
total size is 0 speedup is 0.00
We can update the modification time on some of the files and see that rsync intelligently re-copies only the changed files:
touch dir1/file{1..10}
rsync -azP source destination
Copy
Outputsending incremental file list
file1
            0 100%    0.00kB/s    0:00:00 (xfer#1, to-check=99/101)
file10
            0 100%    0.00kB/s    0:00:00 (xfer#2, to-check=98/101)
file2
            0 100%    0.00kB/s    0:00:00 (xfer#3, to-check=87/101)
file3
            0 100%    0.00kB/s    0:00:00 (xfer#4, to-check=76/101)
. . .
In order to keep two directories truly in sync, it is necessary to delete files from the destination directory if they are removed from the source. By default, rsync does not delete anything from the destination directory.
We can change this behavior with the --delete option. Before using this option, use the --dry-run option and do testing to prevent data loss:
rsync -a --delete source destination
Copy
If you wish to exclude certain files or directories located inside a directory you are syncing, you can do so by specifying them in a comma-separated list following the --exclude= option:
rsync -a --exclude=pattern_to_exclude source destination
Copy
If we have specified a pattern to exclude, we can override that exclusion for files that match a different pattern by using the --include= option.
rsync -a --exclude=pattern_to_exclude --include=pattern_to_include source destination
Copy
Finally, rsync’s --backup option can be used to store backups of important files. It is used in conjunction with the --backup-dir option, which specifies the directory where the backup files should be stored.
rsync -a --delete --backup --backup-dir=/path/to/backups /path/to/source destination
Copy
Rsync can simplify file transfers over networked connections and add robustness to local directory syncing. The flexibility of rsync makes it a good option for many different file-level operations.
A mastery of rsync allows you to design complex backup operations and obtain fine-grained control over what is transferred and how.
https://www.howtoforge.com/install-plex-media-server-on-ubuntu-2004/
Plex Media Server UFW rule
Baked Catfish with Herbs – catfish fillets topped with an herb blend, butter, and lemon and baked until golden. Quick and easy weeknight dinner.


