https://linode.com/docs/email/clients/install-roundcube-on-ubuntu/
Install Roundcube on Ubuntu 16.04
Reply

https://linode.com/docs/email/clients/install-roundcube-on-ubuntu/
https://www.codeproject.com/Articles/1190592/A-Few-Great-Ways-to-Consume-RESTful-API-in-Csharp
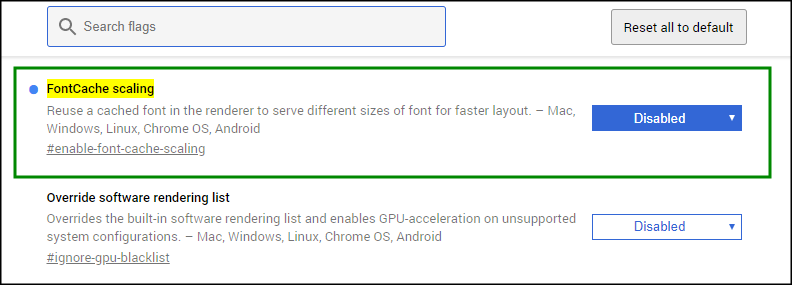
In the address bar of the browser type this and click enter:
chrome://flags/#enable-font-cache-scaling
Set the flag to Disabled and restart the browser.
This is the last Part 5 of the series of articles about setting up site-to-site VPN between on premise LAN and Azure. Here you can learn how to deploy the necessary resources in Azure using a deployment template and the portal. In addition we will configure the IPSec on the router side.
If you missed the Part 4 please check it out here:
NOTE: Azure Resource Manager allows you to provision your applications using a declarative template. In a single template, you can deploy multiple services along with their dependencies. You use the same template to repeatedly deploy your application during every stage of the application lifecycle – microsoft.com
We are going to use one of the quick start deployment templates to create the necessary resources in Azure.
Open a browser and go to this Url:
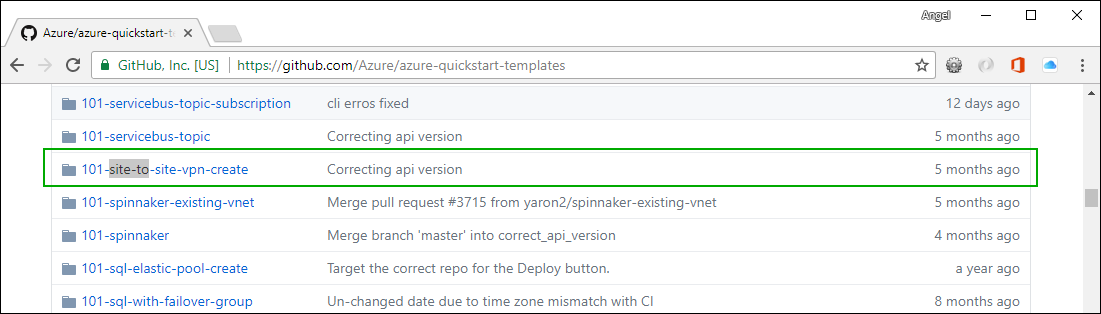
Click on the 101-site-to-site-vpn-create. Then click on the Deploy to Azure button:
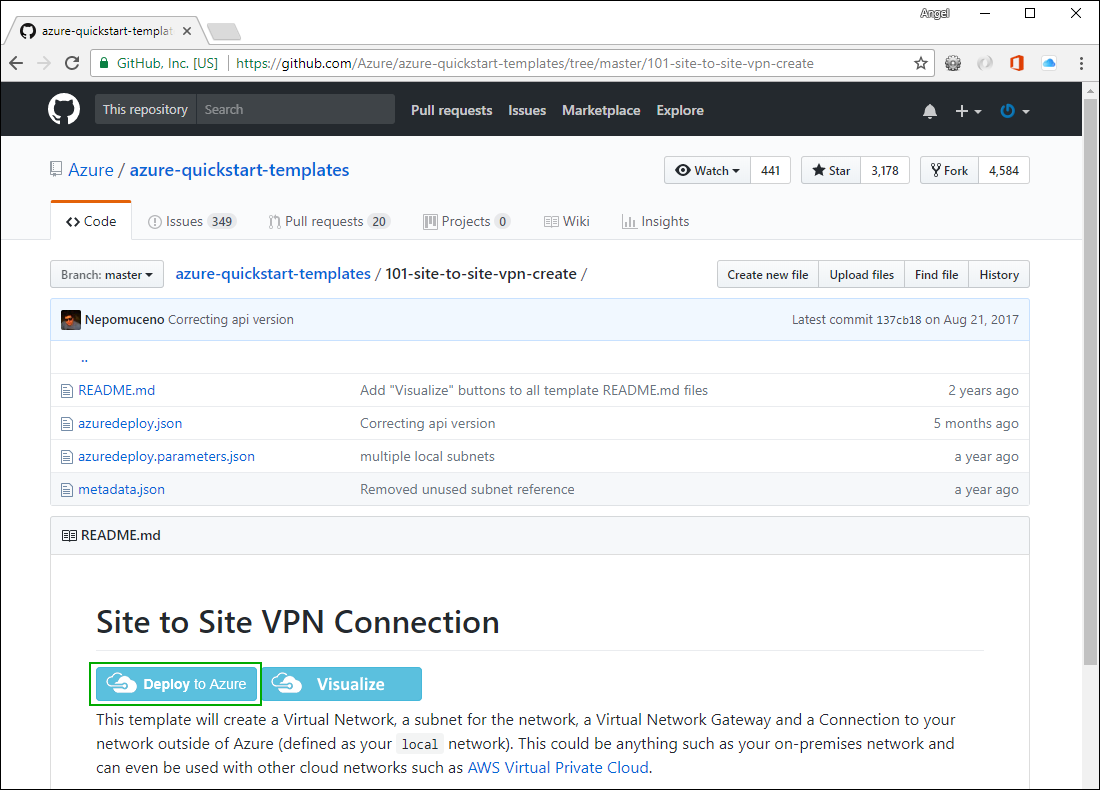
You will be redirected to the Azure RM Portal. Log in if needed. You should see a page where you can customize the template before deploying:
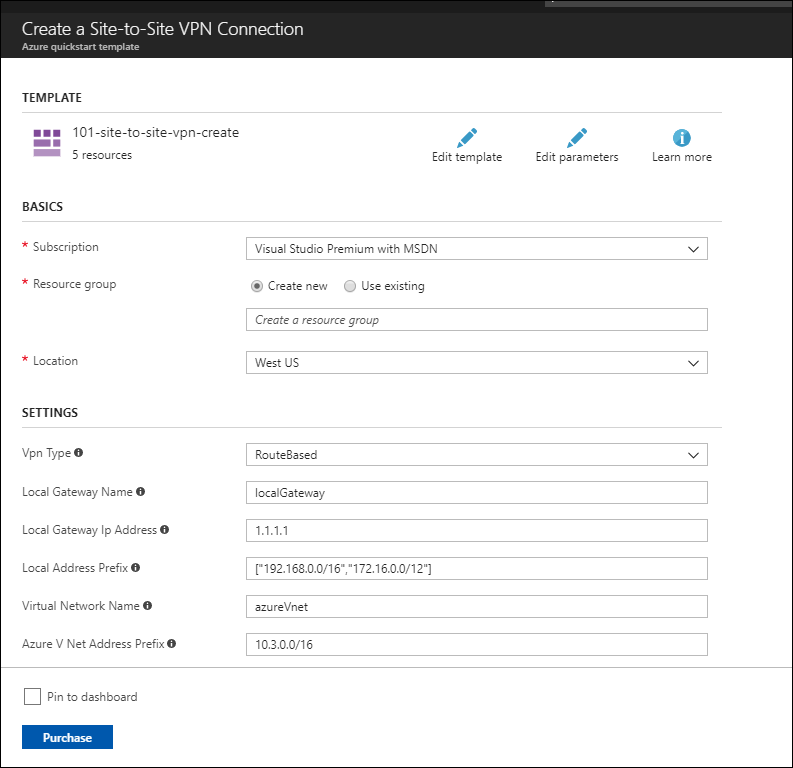
NOTE: One of the resources created by this template is a route-base gateway which has a dynamically assigned public IP address. It is a good idea to make it static. If it is static it will not change over time and you will not have to make changes to the strongSwan configuration file.
Click Edit template and search for publicIPAllocationMethod and change the Dynamic to Static and then click the Save button.

Now enter the information about IP addresses, sub-nets. etc from the network diagram from Part 1:
Here is the completed form:
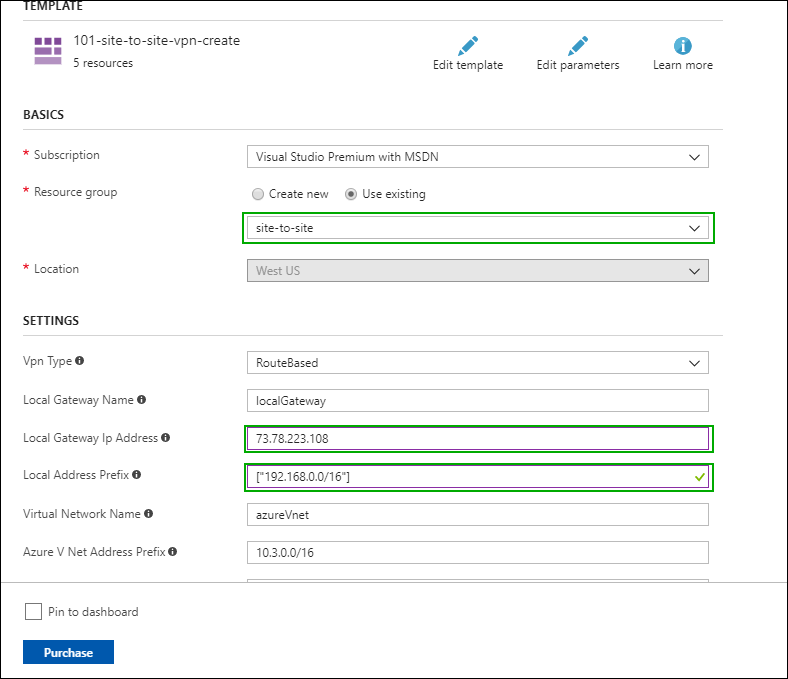
At the bottom of the form (not visible here) is a field called Shared Key. Type any complex string that is hard to guess and take note of it – you will need it when setting up the IPSec on the router. Lets use SecretP@ssw0rd123
Read the terms and conditions and if you accept them check the check-box and click Purchase.
This will start the deployment which can take a long time (around 30 – 40 minutes).
We are going to add a Ubuntu virtual machine to the same resource group (site-to-site) and the same virtual network (azureNet) that we used in the previous step. This is an optional step that will give us an easy way to test the connectivity between a machine in Azure and our home network. In reality you would most likely connect an existing virtual network that already have some virtual machines.
In the portal select the site-to-site resource group and click the “+ Add” button. Type ubuntu in the search box and press <enter>. Select ‘Ubuntu Server 16.04 LTS’ – this will open an additional blade. Make sure the deployment method is set to Resource Manager and press Create button.
In the next blade you have to select a name for the virtual machine. I called mine kingpenguin. I chose HDD for the disk type and Password for the authentication type. Choose the existing resource group site-to-site and click OK.
On the next step you need to specify the virtual machine size. I chose A1 Basic. Click Select.
On the next blade make sure the virtual network is set to azureVnet and the subnet is set to Subnet1 (10.3.1.0/24). You can leave the rest of the parameters unchanged. Click OK.
On the last blade review the information and click Create.
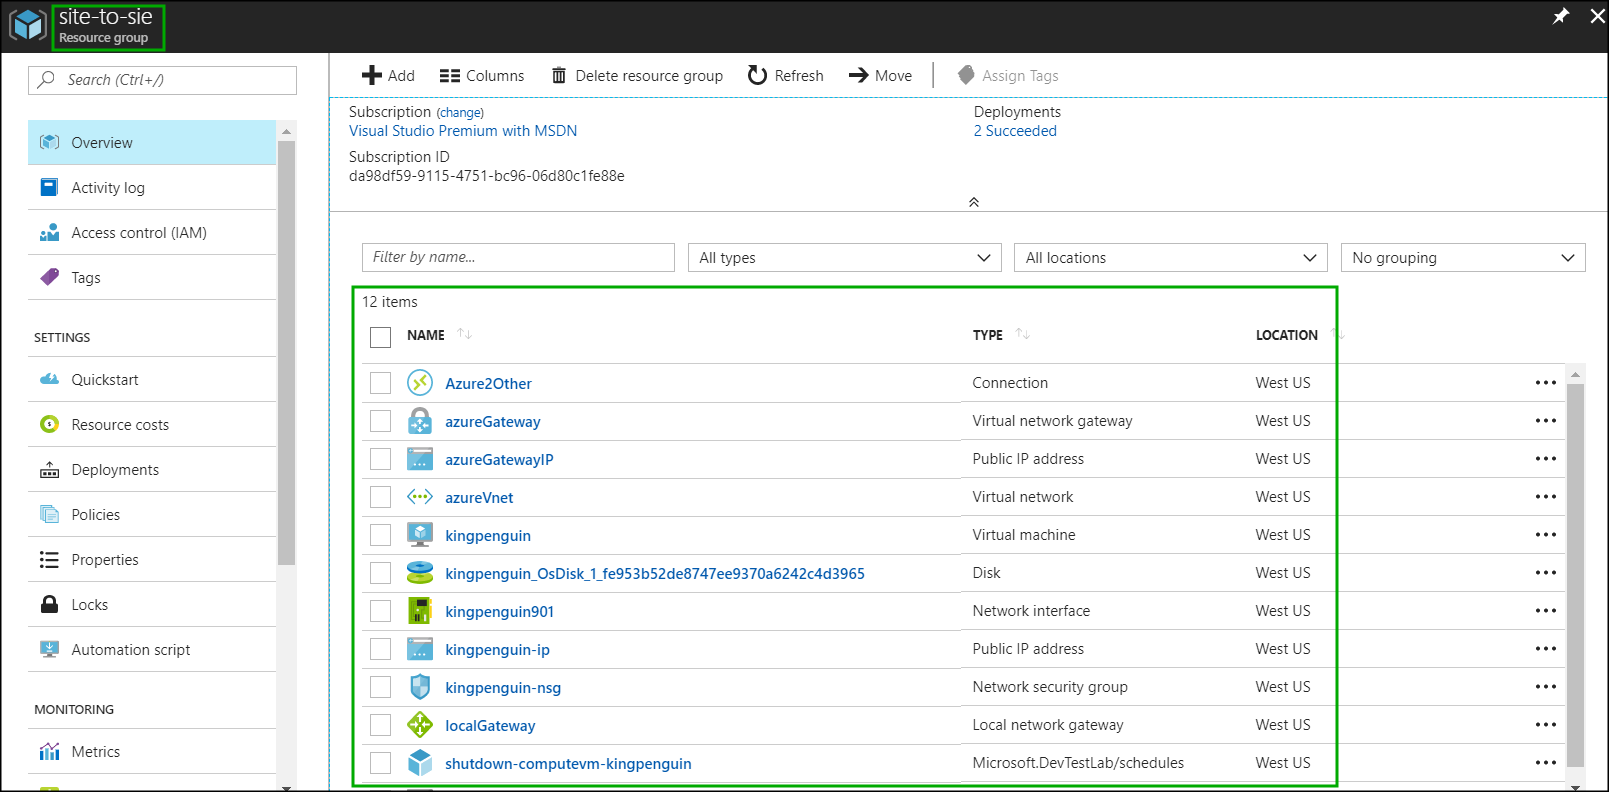
If you go to the resource group it should look similar to this:
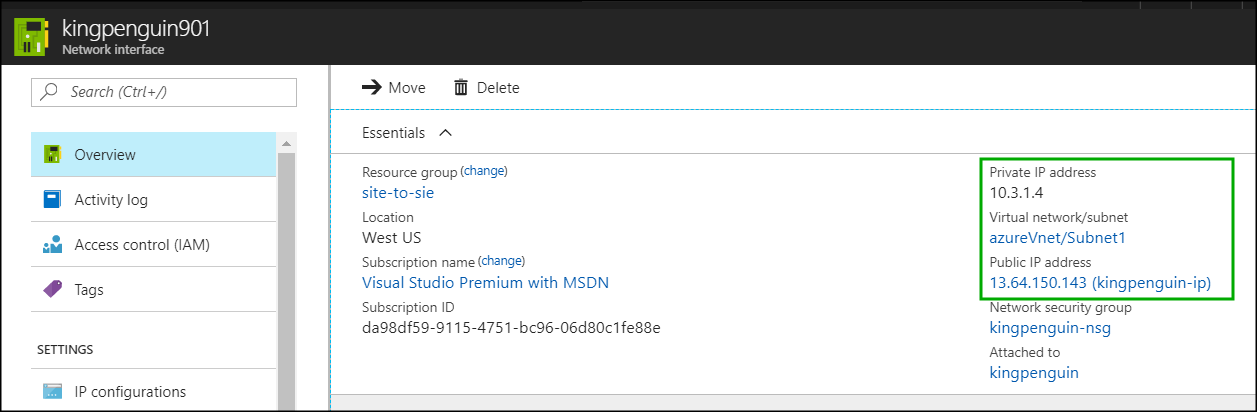
Click on the network interface of our virtual machine to find out the public and the private IP addresses assigned. We will need these later to test the connectivity between the on premise network and the Azure virtual network:
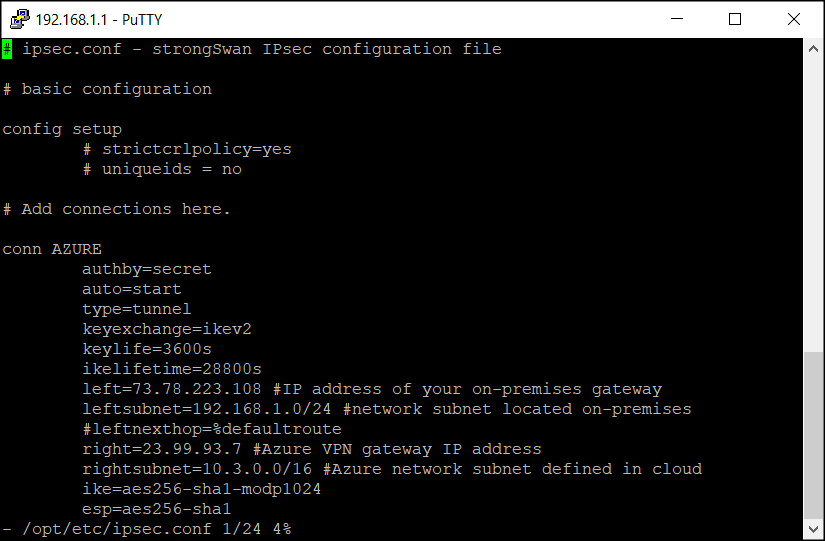
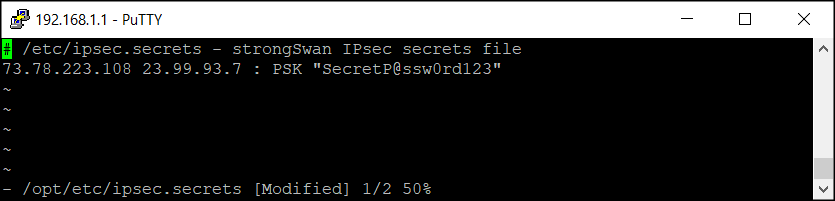
Connect with putty to you router and update ipsec.conf and ipsec.secrets files:
vi /opt/etc/ipsec.conf
# ipsec.conf - strongSwan IPsec configuration file
# basic configuration
config setup
        # strictcrlpolicy=yes
        # uniqueids = no
# Add connections here.
conn AZURE
        authby=secret
        auto=start
        type=tunnel
        keyexchange=ikev2
        keylife=3600s
        ikelifetime=28800s
        left=73.78.223.108 #IP address of your on-premises gateway
        leftsubnet=192.168.1.0/24 #network subnet located on-premises
        #leftnexthop=%defaultroute
        right=23.99.93.7 #Azure VPN gateway IP address
        rightsubnet=10.3.0.0/16 #Azure network subnet defined in cloud
        ike=aes256-sha1-modp1024
        esp=aes256-sha1
vi /opt/etc/ipsec.secrets
# /etc/ipsec.secrets - strongSwan IPsec secrets file
73.78.223.108 40.118.98.33 : PSK "SecretP@ssw0rd123"
SecretP@ssw0rd123“
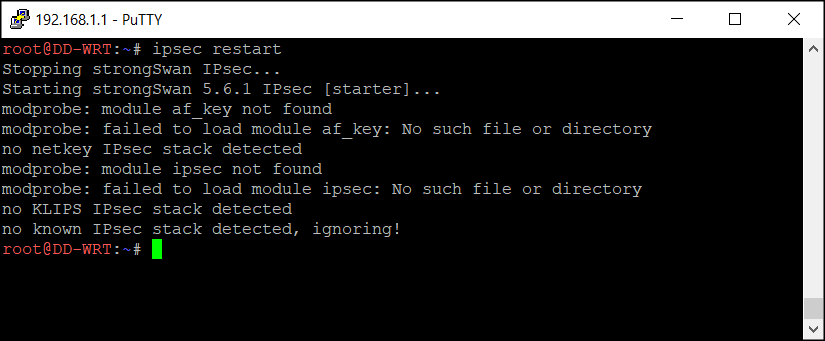
ipsec restart
Now check if the VPN connection has been established:
ipsec status
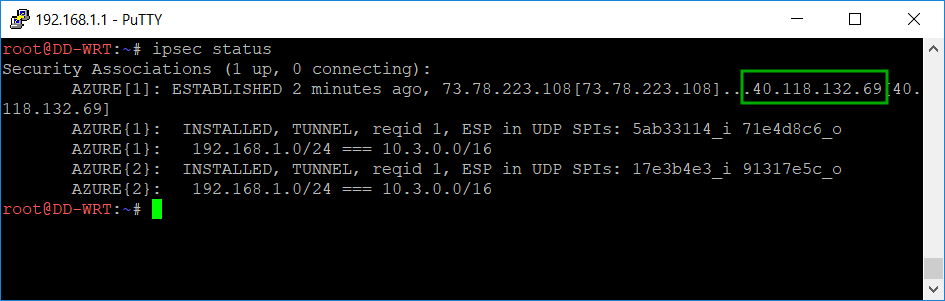
You can notice that the public address of the azure gateway changed from 23.99.93.7 to 40.118.132.69. This is because I was not using the connection for some time and actually defalcated the resource group and later re-created it and a new dynamic public address was assigned. I had to change it in the /opt/etc/ipsec.conf file. Not really a big deal.
The last line in the screen-shot above shows that a connection was established between 192.168.1.0/24 (on premise) and 10.3.0.0/16 (azure VNet).
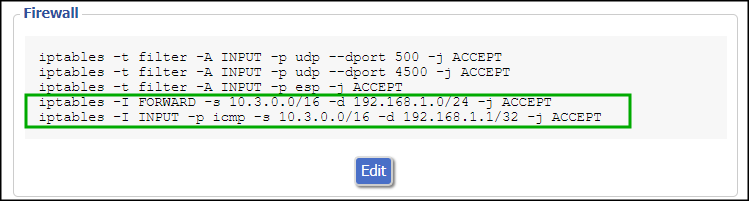
By default your router will allow all outbound traffic with your defined Azure networks, but will block all the traffic initiated to your on-premises subnet. That’s why is necessary to open additional traffic between the two internal networks (on-premises and Azure).
Append the following commands in the Firewall script section. Please keep in mind is necessary to call/execute these commands also in the SSH session in case is necessary to make the changes immediately.
iptables -I FORWARD -s 10.3.0.0/16 -d 192.168.1.0/24 -j ACCEPT
iptables -I INPUT -p icmp -s 10.3.0.0/16 -d 192.168.1.1/32 -j ACCEPT
Now we should be able to ping the private IP address (10.3.1.4) of the Ubuntu virtual machine from our router:
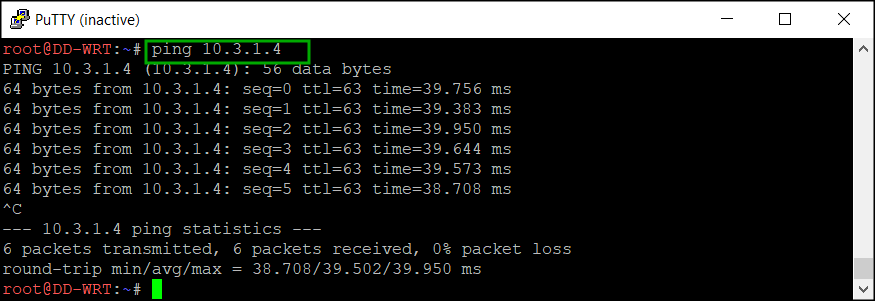
In fact you can do it from any machine on your home network. Here is a screen-shot from my laptop running Windows 10:

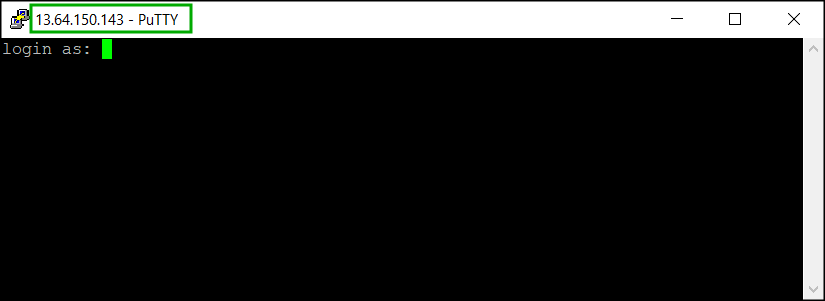
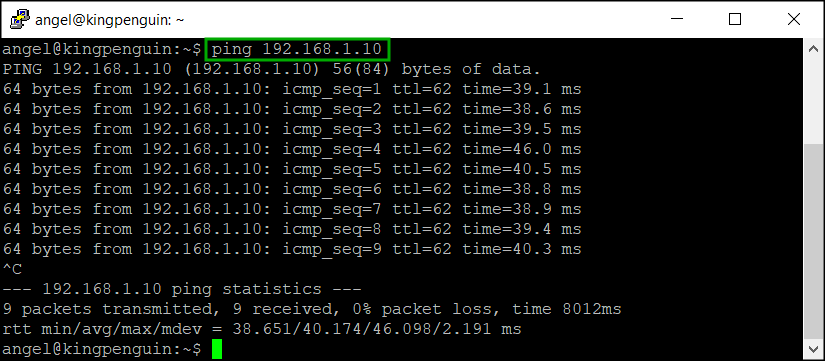
To check the connectivity from Azure to the home network I can SSH to the public IP address of the Ubuntu machine and ping one of my computers at home which IP address happens to be 192.168.1.10:
This is it – you have a site-to-site VPN connection between your home network and Azure. Congratulations!
This is Part 4 of the series of articles about setting up site-to-site VPN between on premise LAN and Azure. Here you can learn how to install and configure strongSwan.
If you missed the Part 3 please check it out here:
From Wikipedia: “strongSwan is a complete IPsec implementation for Linux 2.6, 3.x, and 4.x kernels. The focus of the project is on strong authentication mechanisms using X.509public key certificates and optional secure storage of private keys on smartcards through a standardized PKCS#11 interface.”
To install in on the router do this:
Use putty to telnet to the router and then run this command:
opkg list *strongswan*
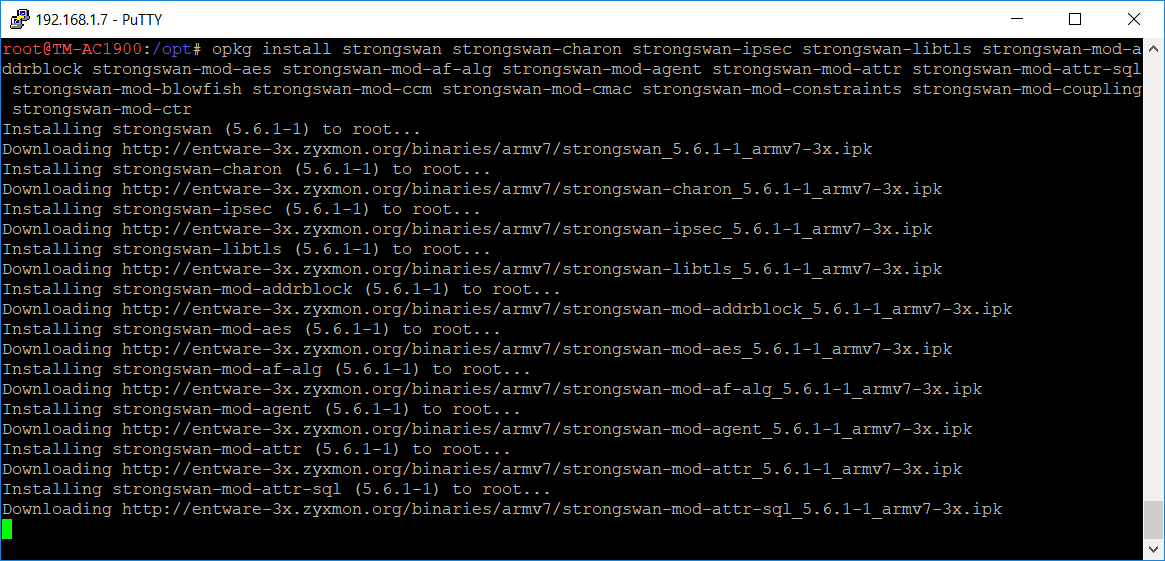
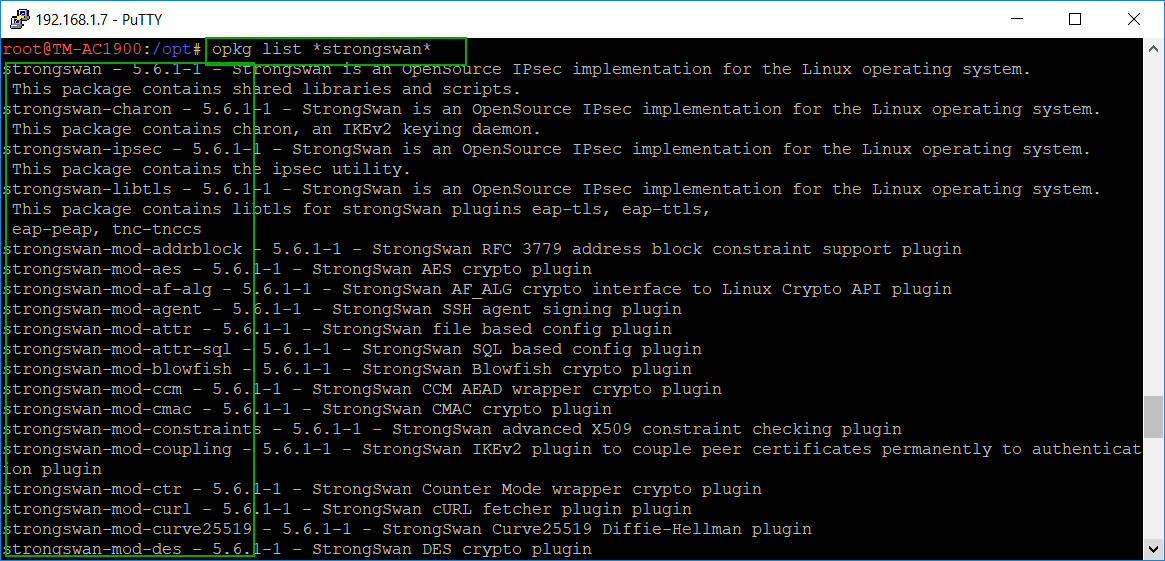 You need to capture the list of modules in order to install them all. I just copied the information from the screen and pasted it in a text file and then split the modules in several opkg install commands:
opkg install strongswan strongswan-charon strongswan-ipsec strongswan-libtls strongswan-mod-addrblock strongswan-mod-aes strongswan-mod-af-alg strongswan-mod-agent strongswan-mod-attr strongswan-mod-attr-sql strongswan-mod-blowfish strongswan-mod-ccm strongswan-mod-cmac strongswan-mod-constraints strongswan-mod-coupling strongswan-mod-ctr
opkg install strongswan-mod-curl strongswan-mod-curve25519 strongswan-mod-des strongswan-mod-dhcp strongswan-mod-dnskey strongswan-mod-duplicheck strongswan-mod-eap-identity strongswan-mod-eap-md5 strongswan-mod-eap-mschapv2 strongswan-mod-eap-radius strongswan-mod-eap-tls strongswan-mod-farp strongswan-mod-fips-prf strongswan-mod-gcm strongswan-mod-gcrypt strongswan-mod-gmp
opkg install strongswan-mod-gmpdh strongswan-mod-ha strongswan-mod-hmac strongswan-mod-kernel-libipsec strongswan-mod-kernel-netlink strongswan-mod-ldap strongswan-mod-led strongswan-mod-load-tester strongswan-mod-md4 strongswan-mod-md5 strongswan-mod-mysql strongswan-mod-nonce strongswan-mod-openssl strongswan-mod-pem strongswan-mod-pgp strongswan-mod-pkcs1
opkg install strongswan-mod-pkcs11 strongswan-mod-pkcs12 strongswan-mod-pkcs7 strongswan-mod-pkcs8 strongswan-mod-pubkey strongswan-mod-random strongswan-mod-rc2 strongswan-mod-resolve strongswan-mod-revocation strongswan-mod-sha1 strongswan-mod-sha2 strongswan-mod-smp strongswan-mod-socket-default strongswan-mod-socket-dynamic strongswan-mod-sql strongswan-mod-sqlite
opkg install strongswan-mod-sshkey strongswan-mod-stroke strongswan-mod-test-vectors strongswan-mod-unity strongswan-mod-updown strongswan-mod-vici strongswan-mod-whitelist strongswan-mod-x509 strongswan-mod-xauth-eap strongswan-mod-xauth-generic strongswan-mod-xcbc strongswan-pki strongswan-scepclient strongswan-swanctl
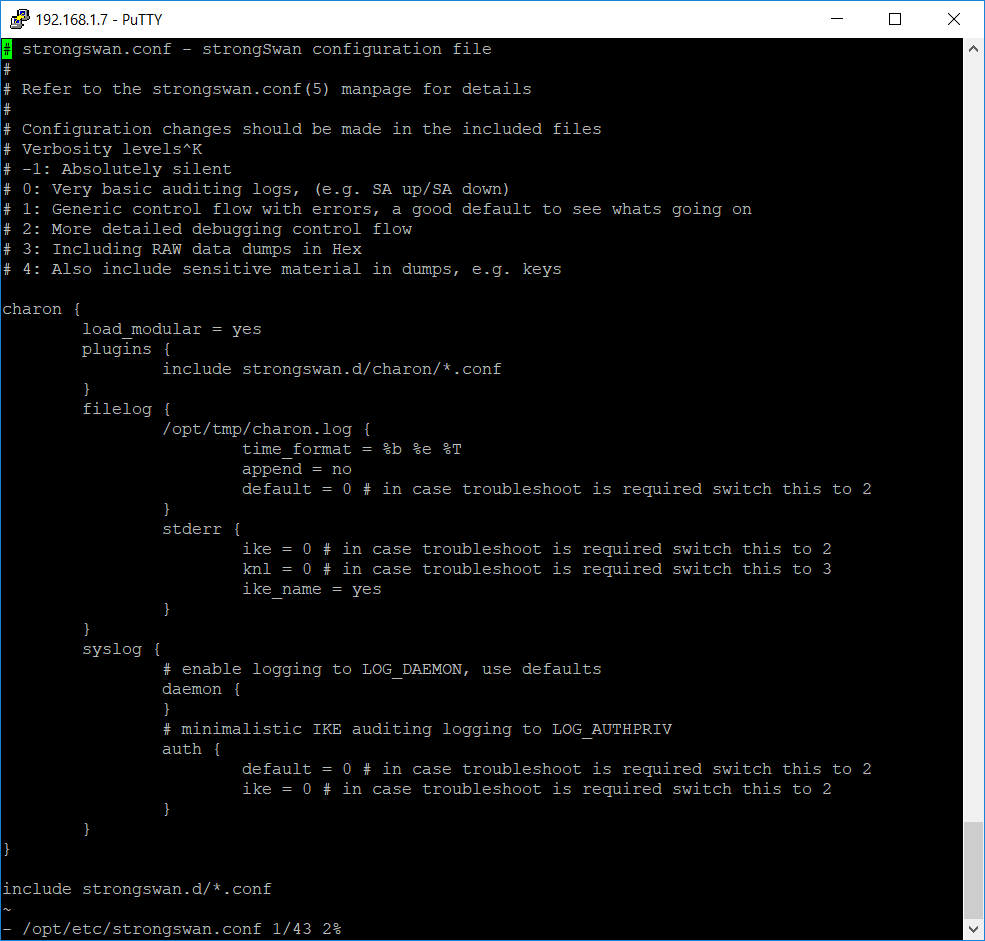
The configuration file of strongSwan is located at /opt/etc/strongswan.conf
Open the file in a text editor and override the content with the following text:
# strongswan.conf - strongSwan configuration file
#
# Refer to the strongswan.conf(5) manpage for details
#
# Configuration changes should be made in the included files
# Verbosity levels
# -1: Absolutely silent
# 0: Very basic auditing logs, (e.g. SA up/SA down)
# 1: Generic control flow with errors, a good default to see whats going on
# 2: More detailed debugging control flow
# 3: Including RAW data dumps in Hex
# 4: Also include sensitive material in dumps, e.g. keys
charon {
        load_modular = yes
        plugins {
                include strongswan.d/charon/*.conf
        }
        filelog {
                /opt/tmp/charon.log {
                        time_format = %b %e %T
                        append = no
                        default = 0 # in case troubleshoot is required switch this to 2
                }
                stderr {
                        ike = 0 # in case troubleshoot is required switch this to 2
                        knl = 0 # in case troubleshoot is required switch this to 3
                        ike_name = yes
                }
        }
        syslog {
                # enable logging to LOG_DAEMON, use defaults
                daemon {
                }
                # minimalistic IKE auditing logging to LOG_AUTHPRIV
                auth {
                        default = 0 # in case troubleshoot is required switch this to 2
                        ike = 0 # in case troubleshoot is required switch this to 2
                }
        }
}
include strongswan.d/*.conf
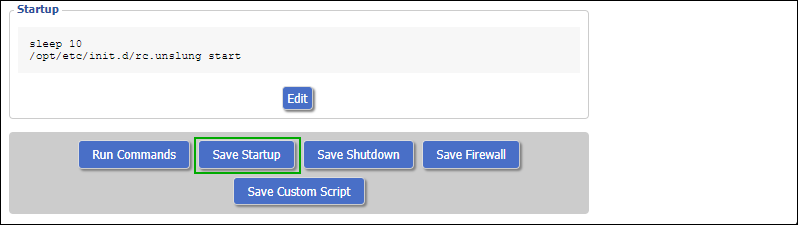
Add these rules to the router firewall (Administration -> Commands -> Save Firewall):
iptables -t filter -A INPUT -p udp --dport 500 -j ACCEPT
iptables -t filter -A INPUT -p udp --dport 4500 -j ACCEPT
iptables -t filter -A INPUT -p esp -j ACCEPT

Reboot the router in order to apply the firewall rules.
This concludes the installation and configuration of the strongSwan.
In the last part we are going to use the Azure RM Portal to deploy a site-to-site template and configure the IPSec on the router. This is the last step and after that you will have a working site-to-site VPN connection from your home network to Azure:
This is Part 3 of the series of articles about setting up site-to-site VPN between on premise LAN and Azure where you will learn how to install Entware-ng-3x.
Entware-ng-3x is a fork of Entware-ng and it uses a newer 3.x kernels to build the toolchain.
If you missed the Part 2 please check it out here:
You need a USB drive with ext2 or ext3 file system. ext3 allows journaling which means more writing to the USB. I do not know how and if possible to disable journaling, so I decided to go with ext2 to minimize the write operations to the USB. If you know more about pros and cons of using ext2 vs. ext3 on a USB flash drive please, feel free to leave a comment.
  fdisk -l
  mkfs.ext2 -L ENTWARE /dev/sda
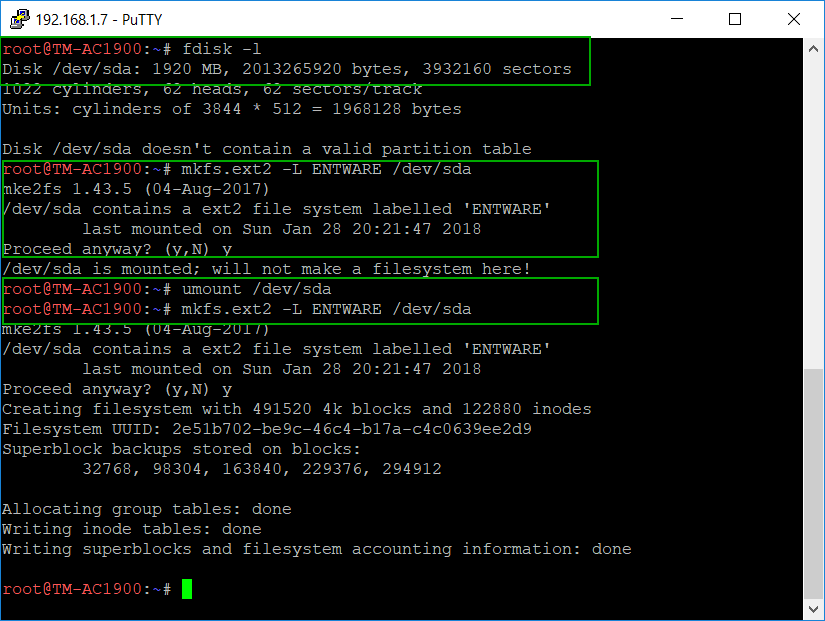 In this case the device is /dev/sda. use -L parameter with mkfs.ext2 to specify the label for the USB drive. You drive may already be formatted and mounted in which case mkfs will not make a file system in order to not accidentally delete any data. If you are sure you want to use this drive anyway, first un-mount it and try again.
NOTE: I am taking these screen-shots after the fact and the IP address shown in the Putty window is different than the one we started with (192.168.29.1). I just noticed it and decided to mention it in case you were wondering.

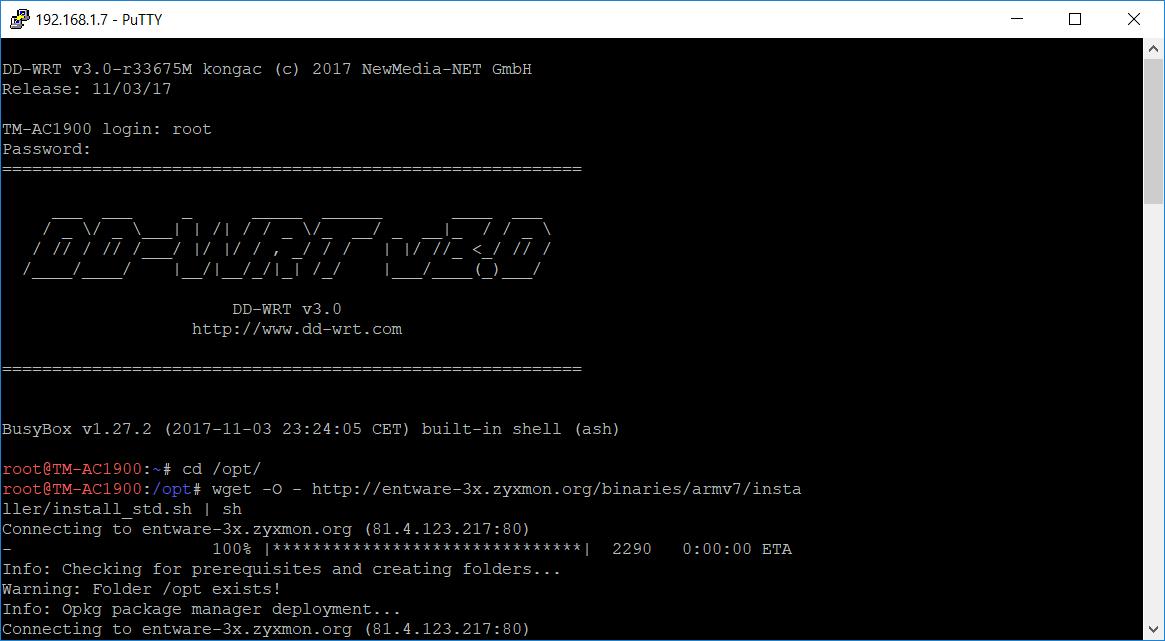 Note: We install the ARM version because the processor of the router is ARM. If you have a different router you should choose the binaries that match it’s processor architecture.
opkg update

opkg upgrade

This concludes the installation of Entware-ng 3x.
In the next part we are going to install strongSwan:
This is Part 2 of the series of articles about setting up site-to-site VPN between on premise LAN and Azure. If you missed the Part 1 please check it out here:
In Part you you will find out how to replace the T-Mobile firmware with DD-WRT
I used the instructions from Asus T-Mobile Cellspot. The main problem was that there were too many external links to follow and too many edits / way to do a certain thing. With so much information you can get lost. My goal is to give you a streamlined process to follow – the same that I followed and that worked for me.
The overall process is as follows:
Downgrading the CFE and the firmware is required in order to “unlock” the router. Without this it will not allow you to flash a third-party firmware like Merlin or DD-WRT.
I am not sure why Merlin was installed before DD-WRT. I followed the instructions and it worked.
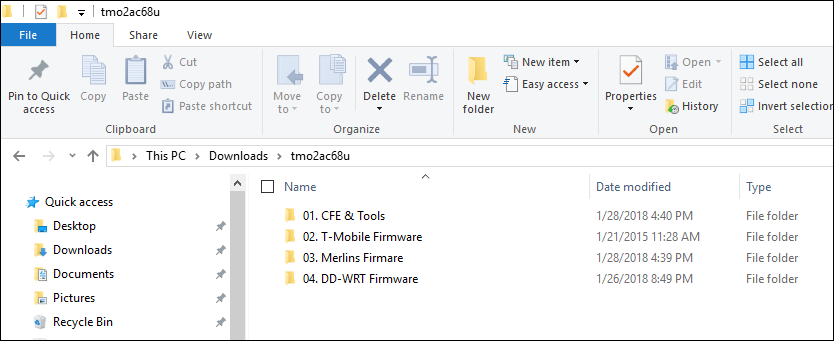
The original article has link to a .rar file that has the tools. I ended up not using some of them (the HEX editor for example). Because of that I compiled my own tmo2ac68u.zip file that has the tools and firmwares I used. Download the file by clicking the link above. Unzip it. It should look like this:
You need to flash the older firmware found in 02. T-Mobile Firmware folder. Do the following:
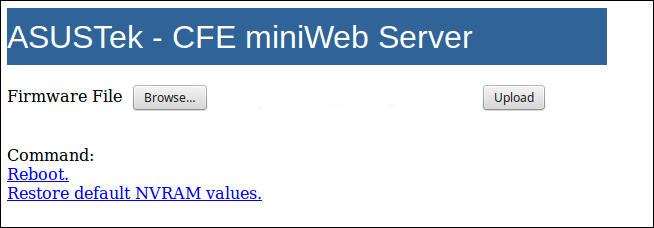
5. Click Browse and select TM-AC1900_3.0.0.4_376_1703-g0ffdbba.trx file from 02. T-Mobile Firmware folder.
6. Click Upload.
7. Perform NVRAM reset by doing:
* Power off the router
* Hold the WPS Button
* Power on the router and keep the WPS pressed for 10-15 seconds
* Reboot and allow 5 minutes to rebuild NVRAM variables.
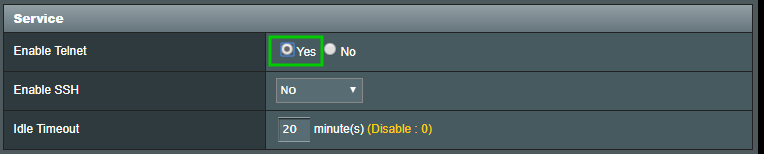
Go to the router homepage (http://192.168.29.1). Enable telnet by navigating: Administration -> System -> Enable Telnet=Yes -> click ‘Apply’
You have to back up the original CFE to a USB stick. The files are small so any size should work, Make sure is is formatted as FAT32.
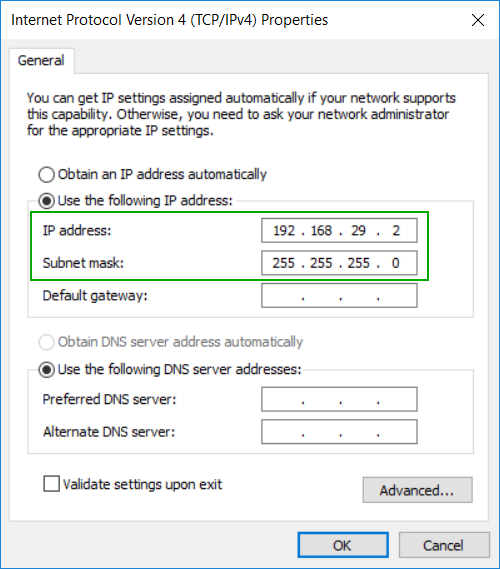
 Run putty.exe from “01. CFE & Tools” folder and connect to 192.18.29.1 on port 23.
cat /dev/mtd0 &gt; /tmp/mnt/USB_NAME/original_cfe.bin
Replace USB_NAME with USB flash drive name:
cd /tmp/mnt/USB_NAME/
mtd-write -i new_cfe.bin -d boot
Again – replace the USB_NAME with the name of your usb drive
clear nvram
erase nvram
reboot
That’s it ! In the next part we are going to install Entware-ng:
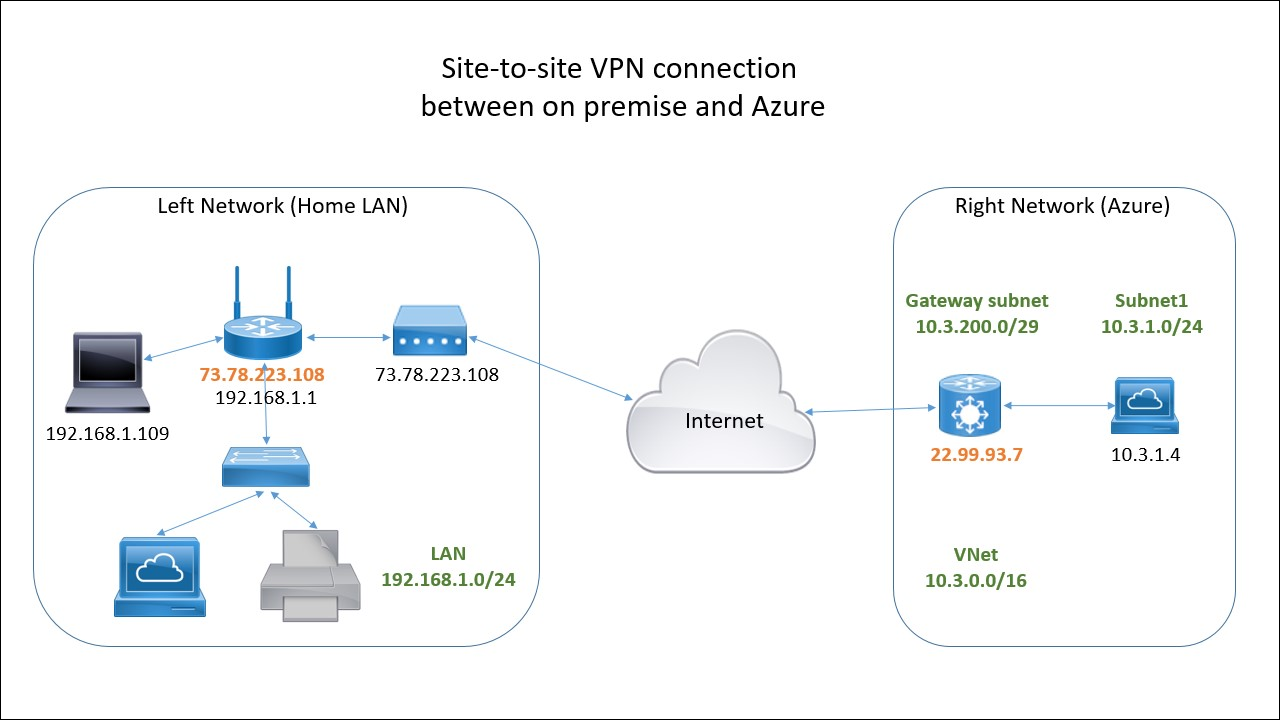
This article describes how to set up a site-to-site VPN between a home network and Azure using a consumer-grade wireless router.
Once completed this will allow you to access the resources (virtual machines, databases, etc. ) in Azure as if they were part of your home LAN. You can also access the resources on your network at home from Azure.
The following diagram shows what the site-to-site VPN will look like at the end:
This article is based on work other people did before me and a would like to give them credit for this. Here are the main sources I used:
Asus RT-AC68U
Asus T-Mobile Cellspot
The two links above and all the other resources linked from there helped me to successfully replace the T-Mobile firmware and replace it with DD-WRT.
Viorel’s article helped me a great deal while installing Entware-NG and configuring strongSwan. In his set-up he uses Tomato Shibby Mod, so if you are using this instead of DD-WRT make sure to check it out.
This whole process can be divided in several steps and I will create a separate posts for each of it. Here I will give the high level overview.
In order to set up a site-to-site VPN with Azure you need a “VPN Device” that can act as a VPN gateway in your on premise network. It can be a hardware device – for example Barracuda NextGen Firewall F-series or a software – Routing and Remote Access Service (RRAS) that comes with Windows Server 2012 R2.
The specialized hardware VPN devices can be expensive. Windows Server license plus a machine to run it on is also expensive. Luckily there is another way – you can use an inexpensive router to achieve the same goal. You may be even lucky to use your existing router if it meets certain requirements.
You router need to support IPsec and IKEv2 . If the stock firmware does not support it you may be able to install alternative firmware that does or install additional software like strongSwan. This is what I did.
I did not want to mess up my existing network, so I decided to buy a new router to play with. I picked a T-Mobile branded router that is actually the same as ASUS RT-AC68U but is just half the price.
Once you get the router the rest of the process is roughly as follows:
Please, read the second part where I describe how to replace the T-Mobile firmware with DD-WRT: