Site-to-Site VPN between on premise network and Azure using DD_WRT and Entware / StrongSwan – part 1 of 5

Introduction

This article describes how to set up a site-to-site VPN between a home network and Azure using a consumer-grade wireless router.

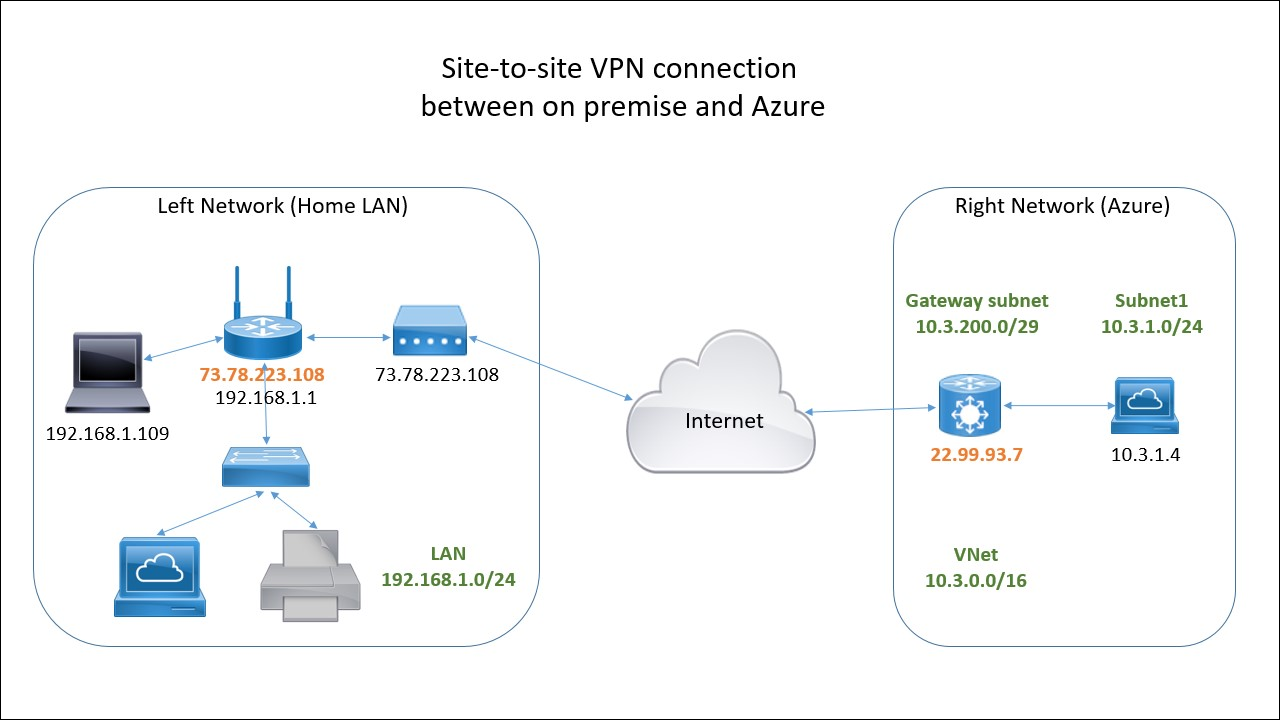
Once completed this will allow you to access the resources (virtual machines, databases, etc. ) in Azure as if they were part of your  home LAN. You can also access the resources on your network at home from Azure.

The following diagram shows what the site-to-site VPN will look like at the end:

Credit

This article is based on work other people did before me and a would like to give them credit for this. Here are the main sources I used:

Asus RT-AC68U
Asus T-Mobile Cellspot

The two links above and all the other resources linked from there helped me to successfully replace the T-Mobile firmware and replace it with DD-WRT.

ON-PREMISES SITE 2 SITE VPN WITH AZURE USING TOMATO SHIBBY MOD (ENTWARE-NG AND STRONGSWAN SETUP) – PART 1

Viorel’s article helped me a great deal while installing Entware-NG and configuring strongSwan. In his set-up he uses Tomato Shibby Mod, so if you are using this instead of DD-WRT make sure to check it out.

One bite at a time

This whole process can be divided in several steps and I will create a separate posts for each of it. Here I will give the high level overview.

In order to set up a site-to-site VPN with Azure you need a “VPN Device” that can act as a VPN gateway in your on premise network. It can be a hardware device – for example Barracuda NextGen Firewall F-series  or a software – Routing and Remote Access Service (RRAS) that comes with Windows Server 2012 R2.

The specialized hardware VPN devices can be expensive. Windows Server license plus a machine to run it on is also expensive. Luckily there is another way – you can use an inexpensive router to achieve the same goal. You may be even lucky to use your existing router if it meets certain requirements.

You router need to support IPsec and IKEv2 . If the stock firmware does not support it you may be able to install alternative firmware that does or install additional software like strongSwan. This is what I did.

I did not want to mess up my existing network, so I decided to buy a new router to play with. I picked a T-Mobile branded router that is actually the same as ASUS RT-AC68U but is just half the price.

Once you get the router the rest of the process is roughly as follows:

  1. Get rid of the T-Mobile firmware. You want to do this because it is locked and does not allow you to flash non-tmobile firmwares.
  2. Install DD-WRT. This is an alternative firmware which I have been using for some time. It allows you to install strongSwan
  3. Install Entware-ng-3x and strngSwan.
  4. Configure the site-to-site VPN


Please, read the second part where I describe how to replace the T-Mobile firmware with DD-WRT:

Site-to-Site VPN between on premise network and Azure using DD_WRT and Entware / StrongSwan – part 2 of 5


Asus RT-AC68U – Original Firmware Install Procedure

This is the procedure to recover to the original firmware after unsuccessful firmware update (courtesy of dd-wrt.com)

Preparation:

1) On a Microsoft windows computer download and install the ASUS recovery tool from:http://www.asus.com/Networking/RTAC68U/HelpDesk_Download/

2) Download the original Asus stock firmware from: http://www.asus.com/Networking/RTAC68U/HelpDesk_Download/

3) Set your windows network settings to a static IP of 192.168.1.5, and subnet 255.255.255.0 (Gateway and DNS not needed).

Recovery Mode Flashing Instructions:

1) Power off the unit.

2) Press and hold on to the WPS button.

3) While holding down the WPS button, power on the unit.

4) Keep holding the WPS button until the power led starts to blink a few times.

5) When the power led starts blinking / flashing, release the WPS button.

6) Power off the unit.

7) Press and hold on to the reset button.

8) While holding down the reset button, power on the unit.

9) Keep holding the reset button until the power led starts to blink on and off repeatedly. (This means the unit is now in emergency recovery mode)

10) Plug in your computer with the ASUS recovery tool directly into Lan port 1 on the router.

11) Run the ASUS Recovery software, and select the stock Asus firmware.

12) Click the “Upload” button.

13) The ASUSrecovery software should detect the router, and start to upload the firmware.

  • If the ASUS recovery software doesn’t detect the router, try disabling your windows firewall, and also disabling and then re-enabling your network adapter in windows networking settings.

14) Once the router has flashed and rebooted with the stock firmware, set your network adapter settings back to DHCP. Your computer should pick up an address from the router, and then you can navigate to 192.168.1.1 in the web browser to start re-configuring the router.


Client-side SSL

Client-side SSL

For excessively paranoid client authentication.

Using self-signed certificate.

Create a Certificate Authority root (which represents this server)

Organization & Common Name: Some human identifier for this server CA.

openssl genrsa -des3 -out ca.key 4096
openssl req -new -x509 -days 365 -key ca.key -out ca.crt

Create the Client Key and CSR

Organization & Common Name = Person name

openssl genrsa -des3 -out client.key 4096
openssl req -new -key client.key -out client.csr
# self-signed
openssl x509 -req -days 365 -in client.csr -CA ca.crt -CAkey ca.key -set_serial 01 -out client.crt

Convert Client Key to PKCS

So that it may be installed in most browsers.

openssl pkcs12 -export -clcerts -in client.crt -inkey client.key -out client.p12

Convert Client Key to (combined) PEM

Combines client.crt and client.key into a single PEM file for programs using openssl.

openssl pkcs12 -in client.p12 -out client.pem -clcerts

Install Client Key on client device (OS or browser)

Use client.p12. Actual instructions vary.

Install CA cert on nginx

So that the Web server knows to ask for (and validate) a user’s Client Key against the internal CA certificate.

ssl_client_certificate /path/to/ca.crt;
ssl_verify_client optional; # or `on` if you require client key

Configure nginx to pass the authentication data to the backend application:

Using CACert Keys


Original posting: https://gist.github.com/mtigas/952344#client-side-ssl