https://radu.cotescu.com/migrating-your-ubuntu-machine-to-a-ssd-drive/
http://ubuntuforums.org/showthread.php?t=2053134
http://www.howtogeek.com/howto/19141/clone-a-hard-drive-using-an-ubuntu-live-cd/

https://radu.cotescu.com/migrating-your-ubuntu-machine-to-a-ssd-drive/
http://ubuntuforums.org/showthread.php?t=2053134
http://www.howtogeek.com/howto/19141/clone-a-hard-drive-using-an-ubuntu-live-cd/
Many computer keyboards have an Fn key. It allows adding a second function to an existing key. An example is the F11 key. In combination with the Fn key it acts as a Volume Down:
Fn + F11 = Volume Down
Some other keyboards have this the opposite way – F11 acts as a Volume Down by default and you have to press and hold Fn in order to get the normal F11 key functionality.
If you want to change the default behaviour and you are lucky enough all it takes is to make the change in the BIOS of the computer. More likely your computer have no such setting so you need to use a keyboard re-mapping software. One such program is SharpKeys.
After installing Ubuntu on a stick the system will let you in without asking for a password. What happens is that the display manager LightDM will auto-login the built-in ubuntu user.
While for many people it may seems convenient and fast I would like to have the system protected by a password. If you think like me then please keep reading to find out how to do it. It took me a lot of trials and errors and even if it is not a perfect solution it works for me.
My first idea was to disable the auto-login for ubuntu user and set a password which I had to type in order to log in. This did not work – for some reason the password kept resetting between the restarts and although I had to type the username (ubuntu) I was able to just press the Enter key and log in.
At the end I did the following:
Step 1) Set a password for the root account:
sudo passwd root
You have to type the password twice. I know it is not recomended but this is my system and I want it that way.
Step 2) Create a new user that you would use most of the times. I will call it joe for example. The best way to create it is to cick the gear icon in the top right corner of the screen and then choose System Settings… -> User Accounts. The click the plus sign (lower left). In the new dialog choose the account type – Standard or Administrator. Type the Full Name and Username. When ready click the Add button.
We have to set a password for this accound and to add it to the sudo group. Open a terminal and type:
sudo passwd joe
You have to type the password twice.
sudo usermod -a -G sudo joe
Step 3) Disable autologin for ubuntu account and enable the manual login
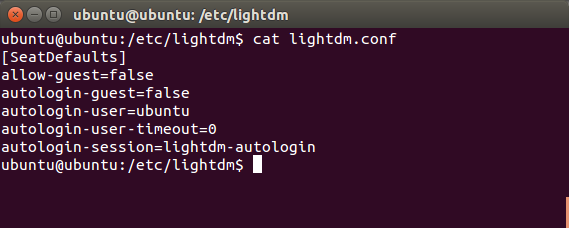
The configuration file that we have to edit is /etc/lightdm/lightdm.conf and initially should look like this:
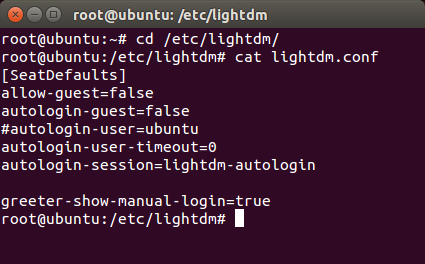
Open the file in your favourite text editor and add the following line to enable the manual login:
greeter-show-manual-login=true
You also need to comment out the autologin-user=ubuntu line by inserting the # sign in the front. Your configuration files should look like this:
Step 4) Lock the ubuntu account
Open a terminal and type:
sudo passwd -l ubuntu
The account will be locked and you cannot use it to login. This means we have two accounts we can use to log in – root and joe.
By default LightDM only shows the user-created accounts on the login page. When you restart the system you will see the user joe which you can click on and type the password in order to login. In addition to that you should see the text Login. If you click it you will be able to type a username, press Enter and then type the password. You can use this way to log in with the root user.
In both cases you are protected by a password. I hope this helps you.
This is a selection of videos about Entity Framework.
Entity Framework 5.0 – Intro to Model First – Part 1 of 2
Entity Framework 5.0 – Intro to Model First – Part 2 of 2
Entity Framework 5 – Database First
I wanted to connect to an OpenVPN server from my Ubuntu on a stick.
There are different clients but the one I liked was the Linux Network-Manager GUI for OpenVPN. To install it you need to enable the Universe repository first:
sudo add-apt-repository universe

sudo apt-get update
and then type:
sudo apt-get install network-manager-openvpn
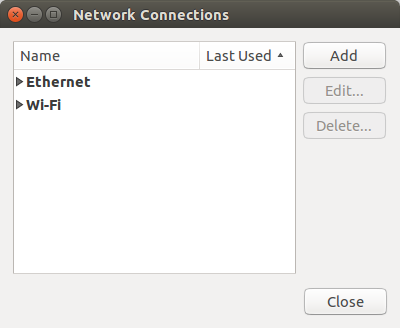
After the installation completes add a VPN connection by clicking on the wireless icon from the top menu and selecting VPN Connections -> Configure VPN. The network connections dialog pops up:
Click the Add button and from the drop-down either select OpenVPN or Import a saved VPN connection… and then click Create button:
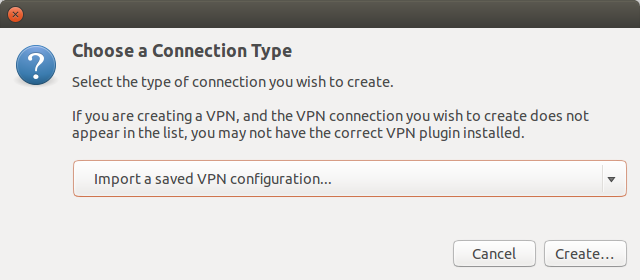
In the first case you have to manually configure everything like the location of the user certificate, the private key, etc.
The second option allows you to import an existing configuration file that already have all these settings defined. What I did was to put the configuration file with all the files referenced by it in one folder and import the configuration file.
You can also configure the existing network connections (both wired and Wi-Fi) to automatically connect to your VPN. This is done in the General tab.