Tag: Azure
What is SmartHotel360 | Microsoft Azure
Build Your First CI/CD Pipeline using Azure DevOps
MASTERING AZURE WITH CLOUD SHELL
Bootstrap Kubernetes the hard way on Microsoft Azure Platform
Infrastructure as Code in the Cloud
Azure and GDPR
Announcing Sitecore 9
https://tech-blog.medtouch.com/2017/10/
…Sitecore 9 allows organizations like this to use alternative databases to store this type of information. Utilizing MongoDB, SQL Azure, SQL Server 2016 or even Azure’s DocumentDB, organizations can store their analytics reliably in a technology they feel comfortable with….
Session: Better Together: Sitecore on Azure
https://tech-blog.medtouch.com/2016/09/16/session-better-together-sitecore-on-azure/
Site-to-Site VPN between on premise network and Azure using DD_WRT and Entware / StrongSwan – part 5 of 5
Introduction
This is the last Part 5 of the series of articles about setting up site-to-site VPN between on premise LAN and Azure. Here you can learn how to deploy the necessary resources in Azure using a deployment template and the portal. In addition we will configure the IPSec on the router side.
If you missed the Part 4 please check it out here:
Create a site-to-site VPN in Azure
NOTE: Azure Resource Manager allows you to provision your applications using a declarative template. In a single template, you can deploy multiple services along with their dependencies. You use the same template to repeatedly deploy your application during every stage of the application lifecycle – microsoft.com
We are going to use one of the quick start deployment templates to create the necessary resources in Azure.
Open a browser and go to this Url:
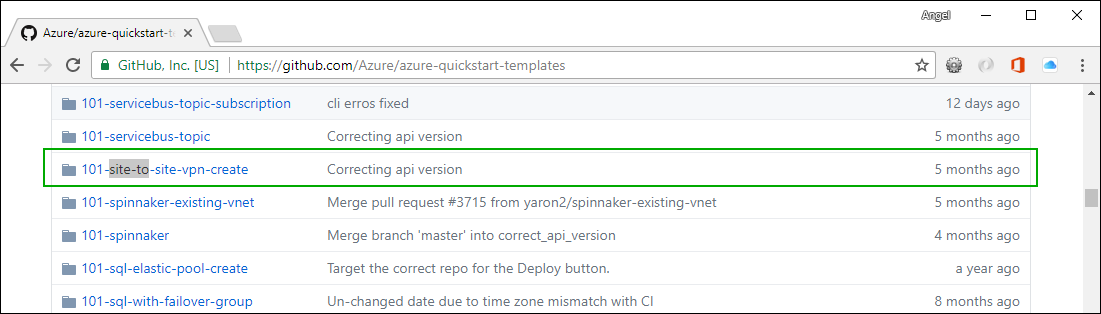
Click on the 101-site-to-site-vpn-create. Then click on the Deploy to Azure button:
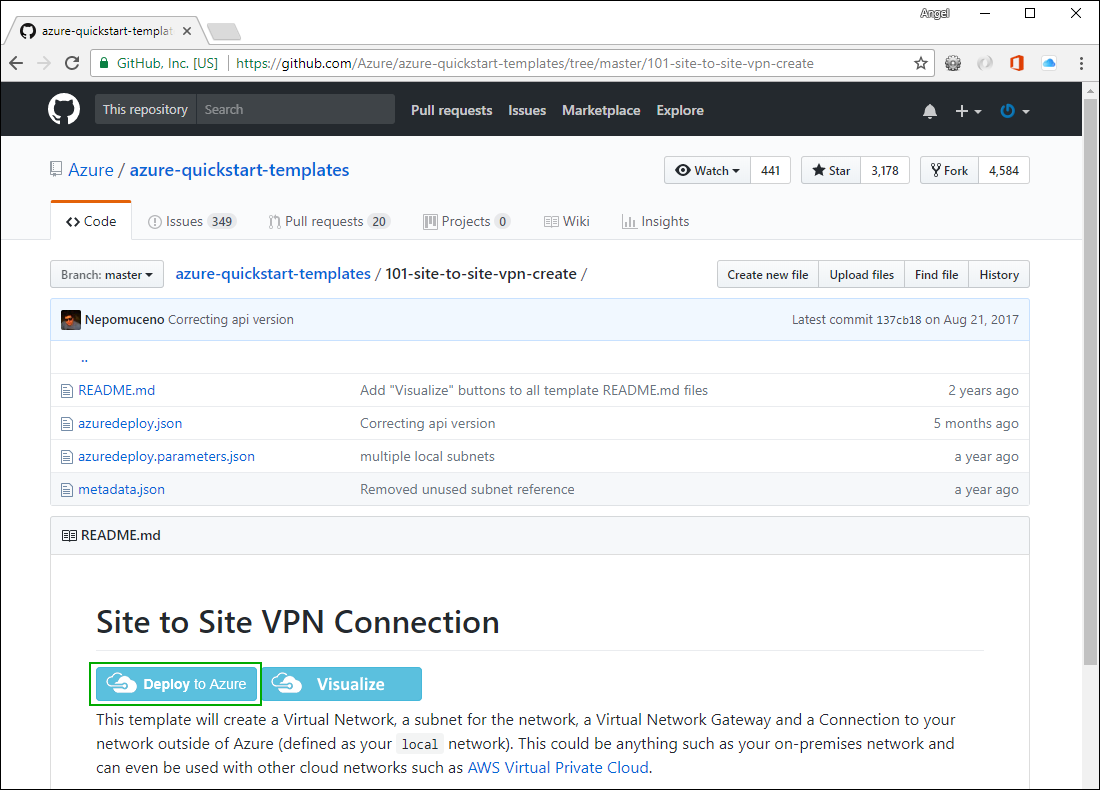
You will be redirected to the Azure RM Portal. Log in if needed. You should see a page where you can customize the template before deploying:
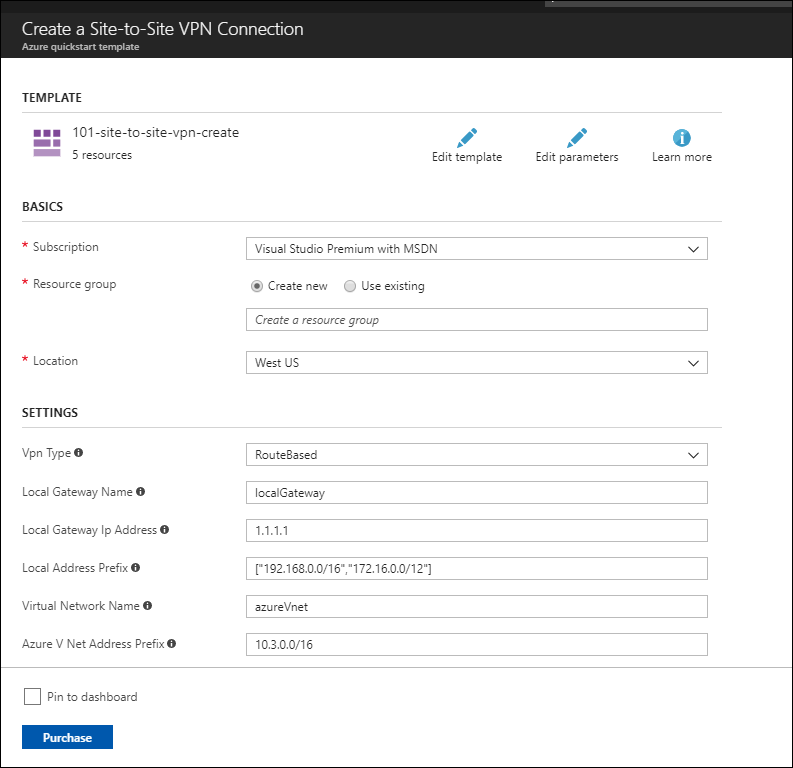
NOTE: One of the resources created by this template is a route-base gateway which has a dynamically assigned public IP address. It is a good idea to make it static. If it is static it will not change over time and you will not have to make changes to the strongSwan configuration file.
Click Edit template and search for publicIPAllocationMethod and change the Dynamic to Static and then click the Save button.

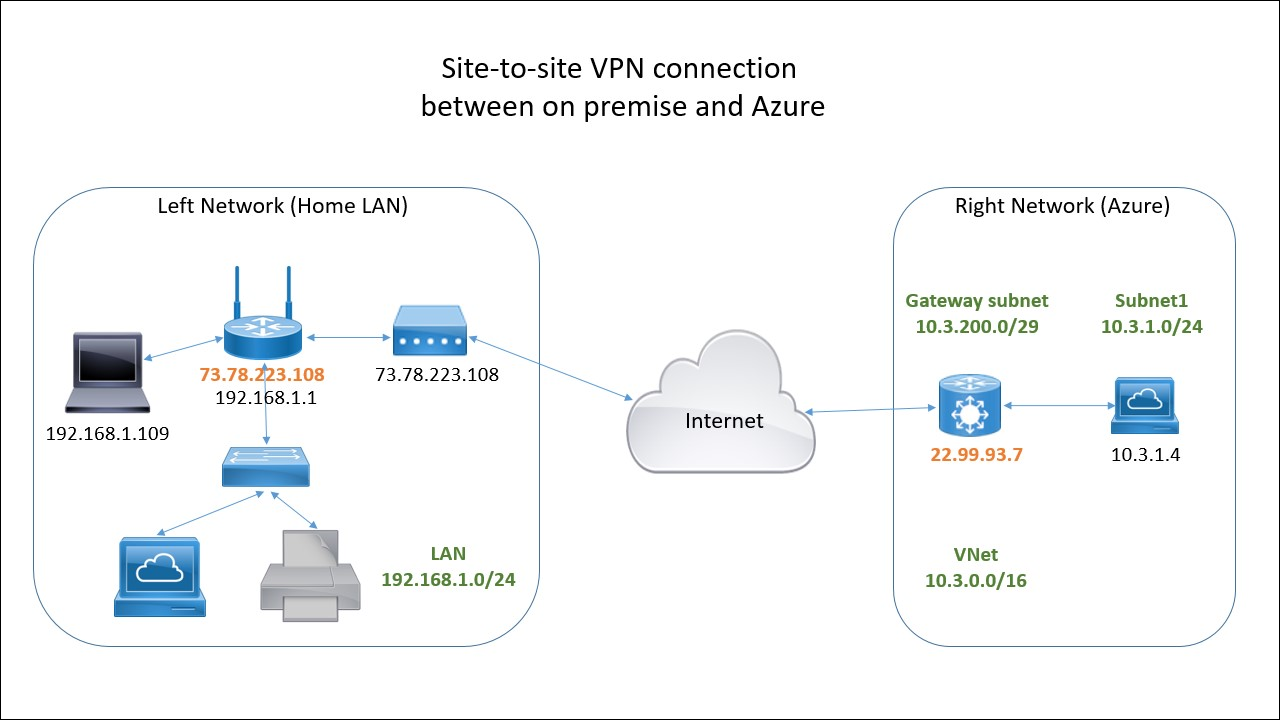
Now enter the information about IP addresses, sub-nets. etc from the network diagram from Part 1:
Here is the completed form:
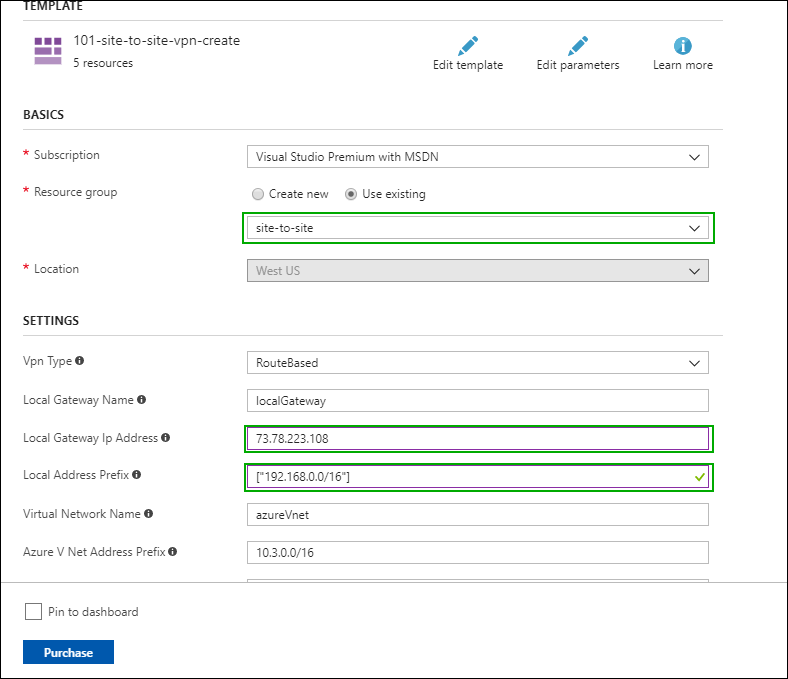
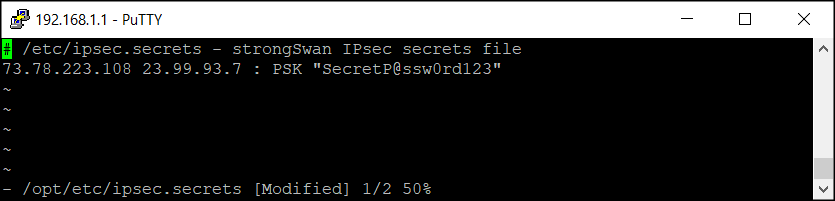
At the bottom of the form (not visible here) is a field called Shared Key. Type any complex string that is hard to guess and take note of it – you will need it when setting up the IPSec on the router. Lets use SecretP@ssw0rd123
Read the terms and conditions and if you accept them check the check-box and click Purchase.
This will start the deployment which can take a long time (around 30 – 40 minutes).
Create a Virtual Machine
We are going to add a Ubuntu virtual machine to the same resource group (site-to-site) and the same virtual network (azureNet) that we used in the previous step. This is an optional step that will give us an easy way to test the connectivity between a machine in Azure and our home network. In reality you would most likely connect an existing virtual network that already have some virtual machines.
In the portal select the site-to-site resource group and click the “+ Add” button. Type ubuntu in the search box and press <enter>. Select ‘Ubuntu Server 16.04 LTS’ – this will open an additional blade. Make sure the deployment method is set to Resource Manager and press Create button.
In the next blade you have to select a name for the virtual machine. I called mine kingpenguin. I chose HDD for the disk type and Password for the authentication type. Choose the existing resource group site-to-site and click OK.
On the next step you need to specify the virtual machine size. I chose A1 Basic. Click Select.
On the next blade make sure the virtual network is set to azureVnet and the subnet is set to Subnet1 (10.3.1.0/24). You can leave the rest of the parameters unchanged. Click OK.
On the last blade review the information and click Create.
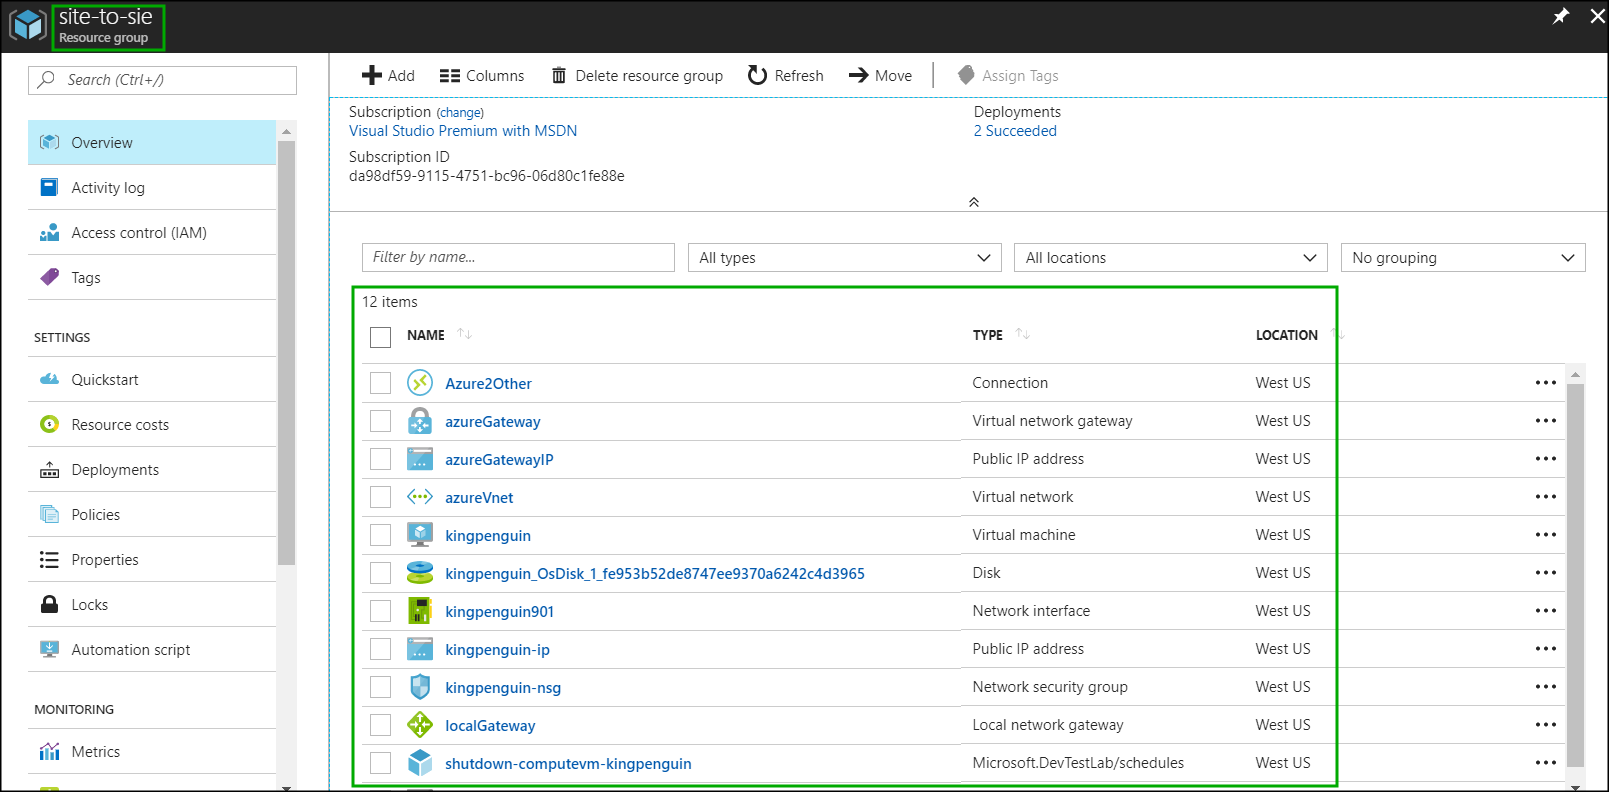
If you go to the resource group it should look similar to this:
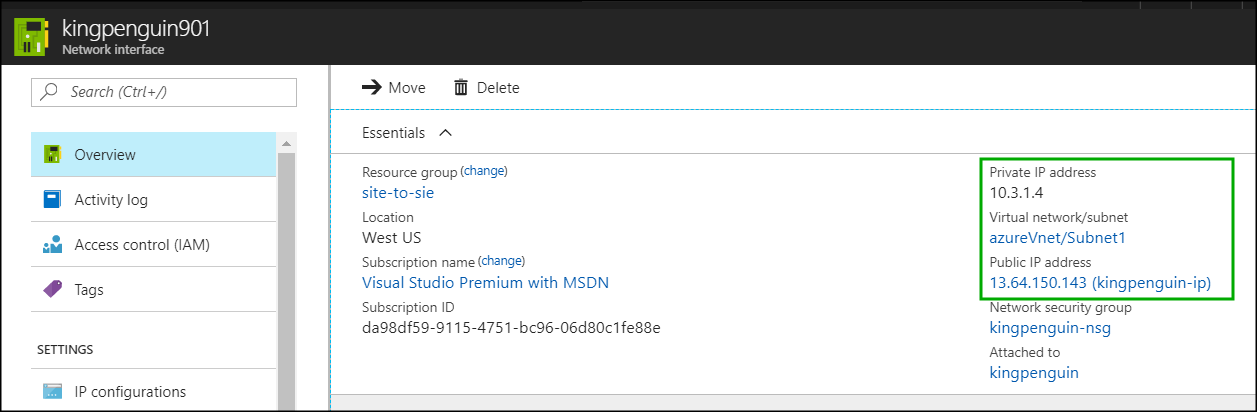
Click on the network interface of our virtual machine to find out the public and the private IP addresses assigned. We will need these later to test the connectivity between the on premise network and the Azure virtual network:
Configure strongSwan on the router
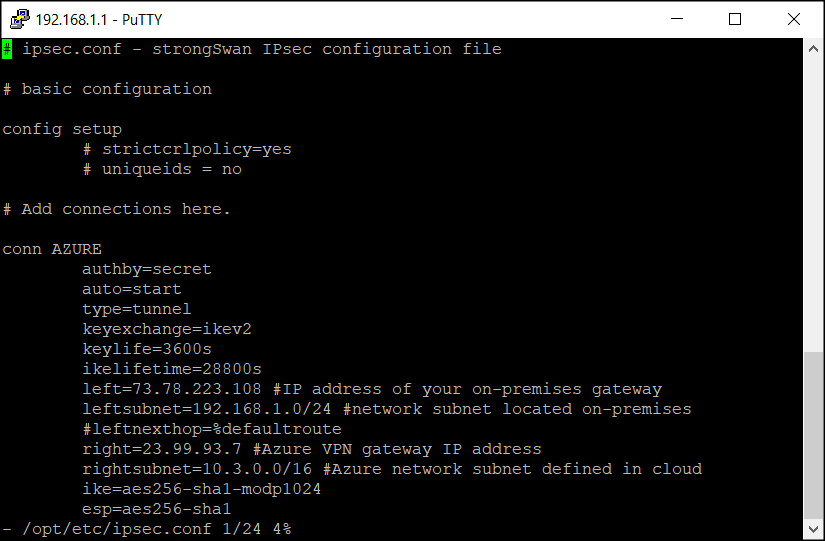
Connect with putty to you router and update ipsec.conf and ipsec.secrets files:
vi /opt/etc/ipsec.conf
# ipsec.conf - strongSwan IPsec configuration file
# basic configuration
config setup
        # strictcrlpolicy=yes
        # uniqueids = no
# Add connections here.
conn AZURE
        authby=secret
        auto=start
        type=tunnel
        keyexchange=ikev2
        keylife=3600s
        ikelifetime=28800s
        left=73.78.223.108 #IP address of your on-premises gateway
        leftsubnet=192.168.1.0/24 #network subnet located on-premises
        #leftnexthop=%defaultroute
        right=23.99.93.7 #Azure VPN gateway IP address
        rightsubnet=10.3.0.0/16 #Azure network subnet defined in cloud
        ike=aes256-sha1-modp1024
        esp=aes256-sha1
vi /opt/etc/ipsec.secrets
# /etc/ipsec.secrets - strongSwan IPsec secrets file
73.78.223.108 40.118.98.33 : PSK "SecretP@ssw0rd123"
SecretP@ssw0rd123“
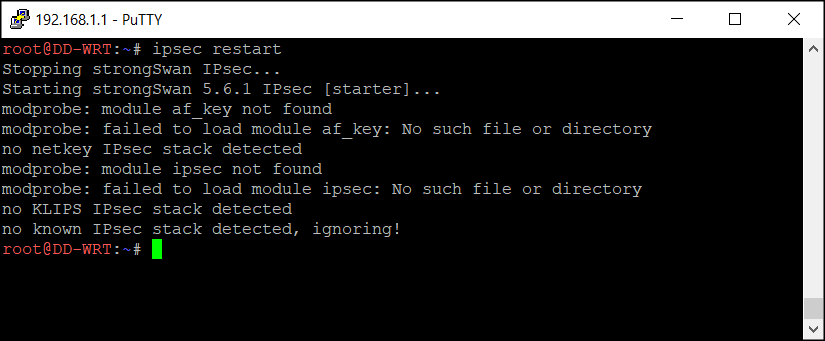
Restart the ipsec:
ipsec restart
Now check if the VPN connection has been established:
ipsec status
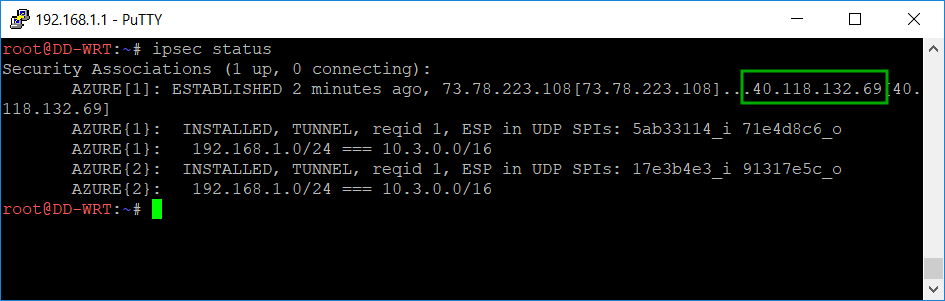
You can notice that the public address of the azure gateway changed from 23.99.93.7 to 40.118.132.69. This is because I was not using the connection for some time and actually defalcated the resource group and later re-created it and a new dynamic public address was assigned. I had to change it in the /opt/etc/ipsec.conf file. Not really a big deal.
The last line in the screen-shot above shows that a connection was established between 192.168.1.0/24 (on premise) and 10.3.0.0/16 (azure VNet).
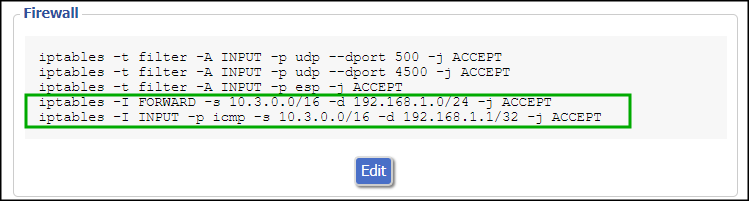
By default your router will allow all outbound traffic with your defined Azure networks, but will block all the traffic initiated to your on-premises subnet. That’s why is necessary to open additional traffic between the two internal networks (on-premises and Azure).
Append the following commands in the Firewall script section. Please keep in mind is necessary to call/execute these commands also in the SSH session in case is necessary to make the changes immediately.
iptables -I FORWARD -s 10.3.0.0/16 -d 192.168.1.0/24 -j ACCEPT
iptables -I INPUT -p icmp -s 10.3.0.0/16 -d 192.168.1.1/32 -j ACCEPT
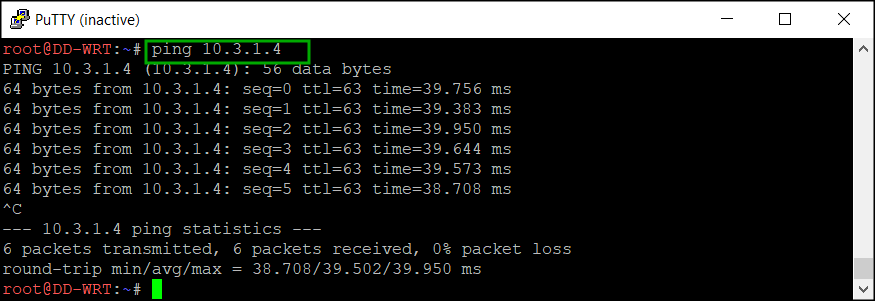
Now we should be able to ping the private IP address (10.3.1.4) of the Ubuntu virtual machine from our router:
In fact you can do it from any machine on your home network. Here is a screen-shot from my laptop running Windows 10:

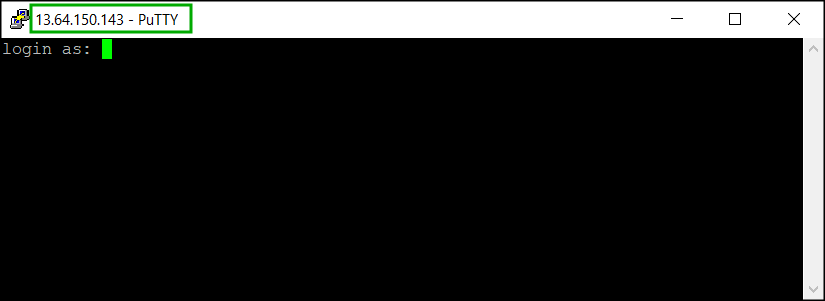
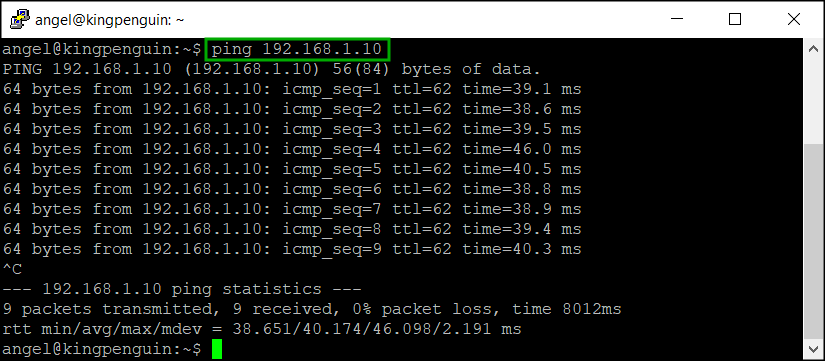
To check the connectivity from Azure to the home network I can SSH to the public IP address of the Ubuntu machine and ping one of my computers at home which IP address happens to be 192.168.1.10:
This is it – you have a site-to-site VPN connection between your home network and Azure. Congratulations!