Contents
Introduction
This is Part 2 of the series of articles about setting up site-to-site VPN between on premise LAN and Azure. If you missed the Part 1 please check it out here:
In Part you you will find out how to replace the T-Mobile firmware with DD-WRT
Flash Asus T-Mobile Cellspot with DD-WRT
I used the instructions from Asus T-Mobile Cellspot. The main problem was that there were too many external links to follow and too many edits / way to do a certain thing. With so much information you can get lost. My goal is to give you a streamlined process to follow – the same that I followed and that worked for me.
The overall process is as follows:
- Download tools and firmwares
- Downgrade the actual firmware
- Backup the CFE (Common Firmware Environment)
- Patch the CFE (change the MAC addresses and the secret code numbers)
- Flash the patched CFE
- Install Merlin firmware
- Install DD-WRT firmware
Downgrading the CFE and the firmware is required in order to “unlock” the router. Without this it will not allow you to flash a third-party firmware like Merlin or DD-WRT.
I am not sure why Merlin was installed before DD-WRT. I followed the instructions and it worked.
Download tools and firmwares
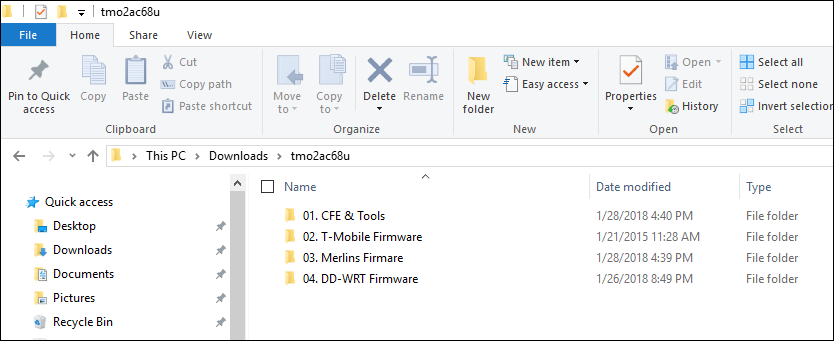
The original article has link to a .rar file that has the tools. I ended up not using some of them (the HEX editor for example). Because of that I compiled my own tmo2ac68u.zip file that has the tools and firmwares I used. Download the file by clicking the link above. Unzip it. It should look like this:
Downgrade the firmware
You need to flash the older firmware found in 02. T-Mobile Firmware folder. Do the following:
- Connect a cable to the Ethernet port of your computer. The other end connect to one of the LAN ports of the router. LAN ports are yellow.
I made the assumption your computer has an Ethernet port. If not – find one that has – you need to be connected with a cable:
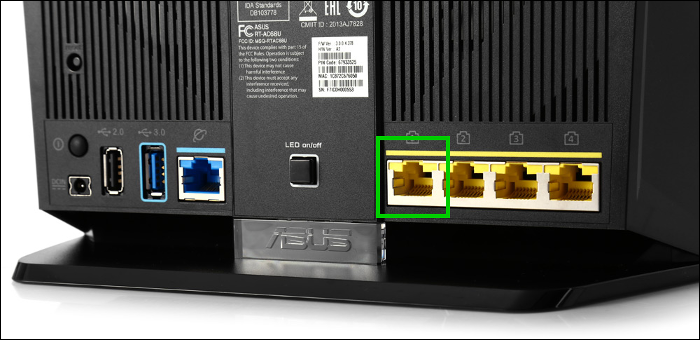
You also need to set a static API address for your Ethernet adapter as shown below: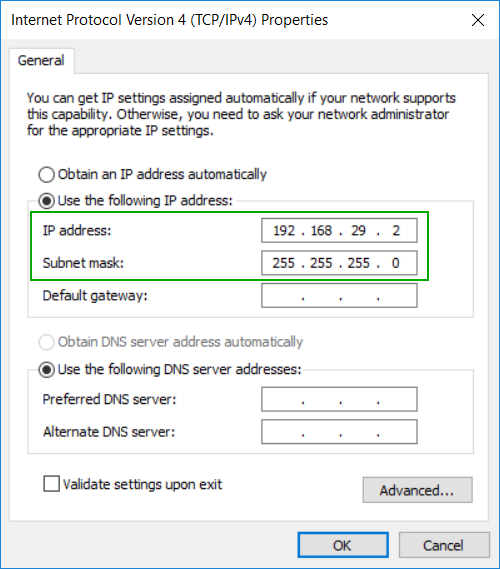
- Disable Wi-Fi. This is to prevent any IP conflict in case the router and your LAN are on the same sub-net.
- Place the router into “recovery mode” by doing the following:
- Turn off router with push button
- Press and hold reset button
- Turn on router with push button
- Release reset button when power light flashes slowly
NOTE: This can be tricky. I was not able to get the power light to flash. I had to try several time and also to use WPS button as described here: Recovery Mode Flashing Instructions
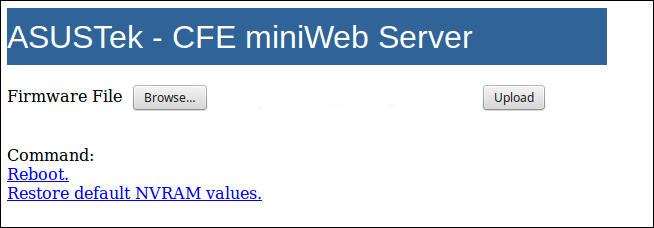
- Use browser to go to router homepage (192.168.29.1 for T-Mobile). You should see something like this:
5. Click Browse and select TM-AC1900_3.0.0.4_376_1703-g0ffdbba.trx file from 02. T-Mobile Firmware folder.
6. Click Upload.
7. Perform NVRAM reset by doing:
* Power off the router
* Hold the WPS Button
* Power on the router and keep the WPS pressed for 10-15 seconds
* Reboot and allow 5 minutes to rebuild NVRAM variables.
Backup the CFE
Go to the router homepage (http://192.168.29.1). Enable telnet by navigating: Administration -> System -> Enable Telnet=Yes -> click ‘Apply’
You have to back up the original CFE to a USB stick. The files are small so any size should work, Make sure is is formatted as FAT32.
- Plug the USB to your computer and copy the following files from “01. CFE & Tools” folder:mtd-write
rt-ac68u_1.0.2.0_us.bin
cfe.exe - Rename rt-ac68u_1.0.2.0_us.bin to new_cfe.bin
- Remove safely (eject) the USB from your computer and connect it to the black (USB2.0) port on the back of the router:
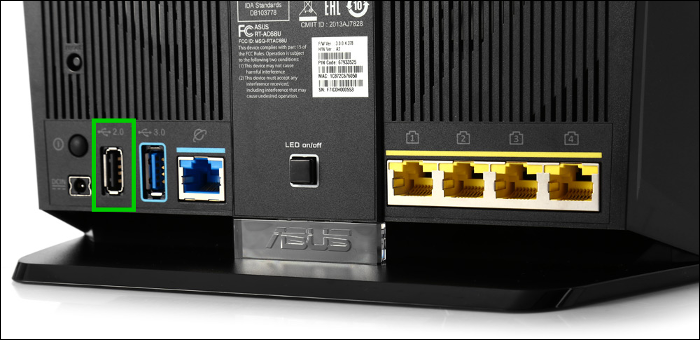 Run putty.exe from “01. CFE & Tools” folder and connect to 192.18.29.1 on port 23.
 - Login with username admin and password password providing you did not change the default ones.
- Save existing CFE onto USB stick:
cat /dev/mtd0 > /tmp/mnt/USB_NAME/original_cfe.bin
- Wait 10 seconds and remove the flash drive from the router
Patch the CFE
- Plug the USB to your computer and verify you have the following file present:
mtd-write
new_cfe.bin
original_cfe.bin
cfe.exe - Run cfe.exe. This will read the MAC addresses and the secret code number from original_cfe.bin and will save it in new_cfe.bin
You should see a message that says the process completed successfully. If you don’t see it try to do it manually as described under Section 5 here. - Eject the USB drive from your computer and connect it to the USB 2.0 port on the router.
Flash the patched CFE
- Wait 15 seconds and perform NVRAM reset (see above for how to do it in case you forgot).
NOTE: This is the part that I was not sure if needed but I followed it. NVRAM reset disabled the telnet and restored the default username and password. This is something to pay attention for. Please, enable telnet again. - Use putty to connect to the router at to 192.18.29.1 on port 23 and run this commands:
cd /tmp/mnt/USB_NAME/
mtd-write -i new_cfe.bin -d boot
Again – replace the USB_NAME with the name of your usb drive
- Wait 15 seconds and reboot the router by typing this command:reboot <Enter>
- Wait until the router is completely rebooted (2-3 minutes to be safe) and perform NVRAM reset (see above for how to do it in case you forgot).
- The NVRAM reset should disable the telnet. Please, enable it again and connect to the router
- Verify the version of the CFE by running this command:nvram get bl_version <Enter>It should show 1.0.2.0
Install Merlin firmware
- Place router in recovery mode
- Flash Merlin firmware from “03. Merlins Firmare” folder via the CFE Webserver recovery mode
- Perform NVRAM reset
Install DD-WRT firmware
- Enable Telnet and connect to the router
NOTE: After flashing Merlin the IP address of the router changed from 192.168.29.1 to 192.168.1.1. I had to change my static address from 192.18.29.2 to 192.18.1.2 to be able to connect via telnet. - Go to Administration -> Firmware Upgrade and flash the Brainslayer version of DD-WRT fount in 04. DD-WRT Firmware\01. BrainSlayer folder.
- Enable Telnet and connect with putty
- Run these to clean the NVRAM and reboot:
clear nvram
erase nvram
reboot
- Use the web interface and go to Administration -> Firmware upgrade and flash the Kong version of DD-WRT found in 04. DD-WRT Firmware\02. Kong folder
- Perform NVRAM reset by doing:
* Power off the router
* Hold the WPS Button
* Power on the router and keep the WPS pressed for 10-15 seconds
* Reboot and allow 5 minutes to rebuild NVRAM variables.
That’s it ! In the next part we are going to install Entware-ng:

